Quantcast
Channel: Baker's corner...somewhere in my kitchen
Viewing all 183 articles
Browse latest View live

Be my Valentine!

$
0
0
DSC_0777


Many people love San Valentine's Day.
Many people hate it.
They all have their reasons. And that's perfectly fine.
As for myself, I neither love it or hate it. I take it because it's there and because I like to feel loved and not only one day, but every single day of the year.
Otherwise we might just as well stop celebrating everything, from our birthday to Christmas.
So put negative thoughts aside at least for today. Colour the world with pink and red, check out for a pink rainbow...

DSC_0754

And share a slice of your favourite cake with someone you love, life is sweeter if covered in sugar.

DSC_0780

Just go out, love and be loved!

DSC_0782


I've really been getting into cake decorating during the last few weeks. And I'm quite happy with the progress I've made in such a short time. I've also been learning from my own mistakes.
So it's one more reason to wish the world was a bit more pink, happy.


DSC_0752

Almost forgot the recipe, for the cake check HERE, and the White chocolate cream cheese cream HERE, and if you'd like to learn more about marshmallow fondant, I've got that, too, right HERE ^__^  
I made these cakes really small, barely 10 cm in diameter, and they are sufficient for 4 servings.

Buckwheat maltagliati with leek and potato soup

$
0
0
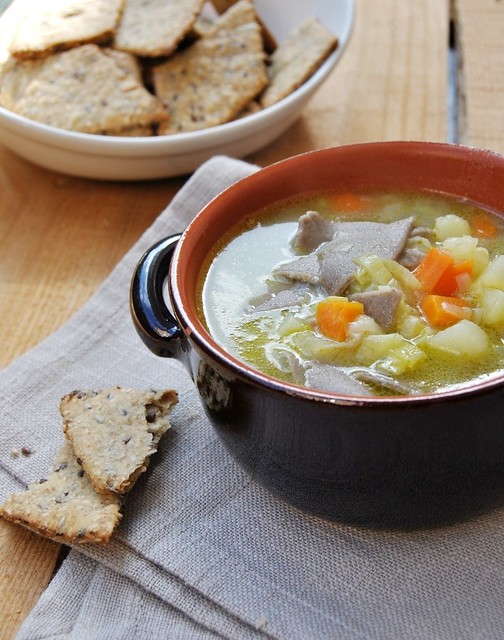
Buckwheat Maltagliati with Leek and Pototo Soup

There's nothing like a bowl of warm, hearty soup on a cold, rainy-snowy day to warm up your body and soul, and to keep you cozy.
That's exactly what I need today.
My daughter refused to get up today and go to preschool. I tried to shake her out of bed without success. Then, when I opened the windows I realized why my little one needed to stay in her warm bed, well covered. As much as I wished for the weather forcast to prove wrong, it didn't. It's snowing again and probably won't stop until Saturday or Sunday.j And this time it's more then regular town traffic complications I'm fearing. It's threatening to ruin our weekend at Lake Garda. We may have to change our plans.
At least the plan for lunch today is fixed and I'm ready for my daily amount of exercise.
First, warm up - keeping my arms in shape... rolling, rolling, rolling.
Second, exercise - a quick walk in hard weather conditions with a 6,5 kg baby and 6,5 kg dog - legs and arms, and plenty more muscles that need work out.
Third - shaping exercise, running around the kitchen, serving lunch, bringing the spoon to my mouth, and quickly, because the baby's already calling me.
Fourth - streching and finally relaxing on the couch like a cat. Oooooooops! If it continues snowing that is to say, and I decide not to take girls swimming today.

What are you up to, any comfort food on your table?

Buckwheat Maltagliati Pasta


Buckwheat Maltagliati with Leek and Potato Soup

Maltagliati pasta:
* 200 g buckwheat pasta
* 2 eggs
* 2 TBspoons extra vergin olive oil
* little salt
Leek soup:
* 3 leeks
* 2 potatoes
* 2 carrots
* 3 TBspoons exstra virgin olive oil
* salt

To make pasta: Sift the flour into a mixing bowl, add the oil, salt and lightly beaten eggs. Mix with your hands and then knead until you get compact dough. *If necessary, add a little cold water.
Cover the dough with a piece of plastic wrap or a clean kitchen towel and let rest for 15-20 minutes.

                   Buckwheat Maltagliati Pasta                                                                                                         
                   Buckwheat Maltagliati Pasta

For the soup, slice the carefully cleaned and washed leeks. Cut the potatoes and carrots into cubes.
Warm 3 TBspoons of EVOO in a pot, add the vegetables and sautèe for a few minutes.
Add about 1,5 liters water, salt, cover and cook on medium heat for at least 15-20 minutes.

Roll out the dough rather thin on a lightly floured kneading board using a rolling pin.
With a knife or a pizza cutter cut the dough into irregular sized shapes.

                 Buckwheat Maltagliati Pasta  Buckwheat Maltagliati

Add the pasta to the soup and cook everything together for 5 more minutes.
Serve warm.


Buckwheat Maltagliati with Leek and Pototo Soup


Maltagliati di grano saraceno in zuppa di porri e patate
(da Cucina naturale)

Maltagliati
* 200 g di farina di grano saraceno
* 2 uova
* 2 cucchiai di olio extravergine d'oliva
* un po' di sale
Zuppa di porri:
* 3 porri
* 2 patate
* 2 carote
* 3 cucchiai di olio extravergine d'oliva
* sol

Per la pasta: setacciate la farina dentro una ciotola. Aggiungete il sale, l'olio e le uova leggermente sbattute. Mescolate e impastate bene. Se necessario aggiungete un pochino d'acqua.
Coprite la pasta e lasciatela riposare 15-20 minuti.

Per la zuppa, tagliate i porri ben puliti e lavati a rondelle, e le patate e carote a cubetti. Scaldate l'olio in una pentola e rosolatevi le verdure per qualche minuto a fuoco medio basso.
Versatevi circa 1,5 l di acqua, salate, coprite e lasciate cuocere per almeno 15-20 minuti.

Stendete la pasta su un piano di lavoro leggermente infarinato e tagliatela a rombi irregolari.
Aggiungete la pasta nella pentola con la zuppa e lasciate cuocere insieme per 5 minuti.
Servite la zuppa calda.


Buckwheat Maltagliati with Leek and Pototo Soup


Maltagliati od heljdinog brašna s varivom od poriluka i krumpira

Maltagliati
* 200 g heljdinog brašna
* 2 jaja
* 2 žlice maslinovog ulja
* malo soli
Varivo
* 3 poriluka
* 2 krumpira
* 2 mrkve
* 3 žlice maslinovog ulja
* sol

Za tjesteninu, stavite heljdino brašno u zdjelu, dodajte jaja i ulje pa zamijesite črvrsto tijesto (po potrebi dodajte sasvim malo vode).
Ostavite tijesto da odmori 15-ak minuta, pokriveno.

Za varivo, narežite poriluk na kolutiće, a mrkvu i krumpir na kockice.
Zagrijte 3 žlice ulja, dodajte povrće i pirjajte 5 minuta na laganoj vatri miješajući.
Dodajte 1,5 litru vode, posolite, poklopite i kuhajte barem 15-20 minuta.

Razvaljajte tijesto tanko na pobrašnjenoj podlozi.
Izrežite ga na manje, nepravilne rombove.
Dodajte tjesteninu u varivo i kuhajte još 5 minuta.
Poslužite toplo.

Buckwheat Maltagliati with Leek and Pototo Soup

Gift box cookies

$
0
0

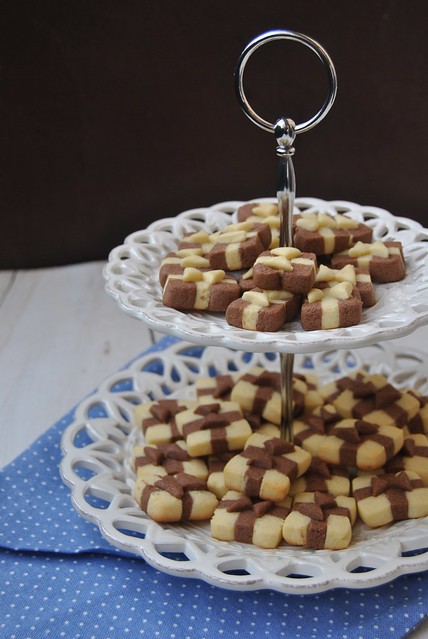
Gift cookies

These cookies are so cute and festive, that I wanted to make the minute I saw them. For Christmas, that is to say. But didn't think my oven would be so disobedient to break during the Christmas baking week.
Postponed but not forgotten.
My older daughter's birthday party was just the right occasion and finally, here they are.
Hope you give them a try, don't wait for a big occasion, every day we live is a gift. And sometimes it's better to leave it unwrapped.


Gift cookies


Gift box cookies
(original recipe here)

White dough:
* 100 g butter
 * 100 g sugar
* 1 egg
* 1/2 teaspoon vanilla extract
* 260 g flour
Dark dough:
* 100 g butter
* 100 g sugar
* 1 egg
* 1/2 teaspoon vanilla extract
* 245 g flour
* 15 g unsweetened cocoa

Prepare the two doughs separately.
Mix the butter and sugar with the vanilla extract until creamy.
Add the egg, and in the end the sifted flour (flour + cocoa for the dark dough).
Bring everything together to form smooth and soft dough.
Wrap each dough separately in a piece of plastic wrap and refrigerate for about 1 hour.
Roll the chilled white dough out with a rolling pin to 1 cm thick.
Cut it into 2 cm large strips.
Roll the dark dough out to 5 mm thick and cut it into 2 cm large strips.
Sandwich 2 white strips with a dark one in the middle.
Cut the thus obtained sandwich in half lenghtwise and insert another dark strip horizontaly in between joining the two halfs again.

Gift cookies Gift cookies Gift cookies  Gift cookies
Gift cookies Gift cookies

You may do the same thing inverting the dark and the white dough to get the opposite contrast.
Save some dark and/or white dough to make bows on top.
Wrap the logs in a piece of plastic wrap and chill well in the fridge.
Slice the logs into 1 cm thick pieces and place them on a baking tray just slightly apart.
Cut some of the leftover dough into little squares and then cut each diagonally into triangles. Put two triangles on top of each cookie to form a bow on your gift box.
Bake the cookies in an oven preheated to 180°C for about 15 minutes or until the edges are just lightly golden.


Gift cookies


Biscottini regalo

Pasta chiara;
* 100 g burro
 * 100 g zucchero
* 1 uovo
* 1/2 cucchiaino di estratto di vaniglia
* 260 g farina
Pasta scura:
* 100 g burro
 * 100 g zucchero
* 1 uovo
* 1/2 cucchiaino di estratto di vaniglia
* 245 g farina
* 15 g di cacao amaro

Preparate i due impasti separatamente procedendo nello stesso modo:
Lavora il burro a temperatura ambiente con lo zucchero e l'estratto di vaniglia.
Unite prima l'uovo e poi la farina setacciata (la farina + il cacao per l'impasto scuro).
Avvolgete i due impasto con un po' di pellicola alimentare e lasciate riposare in frigo per 1 oretta.
Stendete l'impasto chiara ad uno spessore di 1 cm e tagliatelo in strisce larghe 2 cm.
Stendete l'impasto scuro ad uno spessore di 5 mm e tagliatelo in strisce larghe 2 cm.
Posate una striscia scura su una chiara e coprite con un'altra striscia chiara creando un sandwich.
Tagliate a metà nel senso di lunghezza e inserite in mezzo, orizzontalmente, un'altra striscia di pasta scura ricomponendo i due lati tagliati.
Avvolgete questi "tronchetti" nella pellicola e lasciateli raffreddare bene in frigo, un ora circa.
Con un coltello tagliate i tronchetti a fettine spesse 1 cm e sistematele su una placca da forno.

Gift cookies


Keksići poklončići

Svijetlo tijesto:
* 100 g maslaca
 * 100 g šećera
* 1 jaje
* 1/2 žličice ekstrakta vanilije
* 260 g brašna
Tamno tijesto:
* 100 g maslaca
* 100 g šećera
* 1 jaje
* 1/2 žličice ekstrakta vanilije
* 245 g brašna
* 15 g gorkog kakaa

Pripremite odvojeno svijetlo i tamno tijesto:
Izradite omekšali maslac sa šećerom i vanilijom da bude kremast (mikserom ili drvenom kuhačom).
Umiješajte jaje, i na kraju brašno (brašno i kakao za tamno tijesto).
Omotajte oba tijesta prozirnom folijom i ostavite oko 1 sat u hladnjaku.
Razvaljajte svijetlo tijesto na 1 cm debljine.
Izrežite ga na trake širine 2 cm.
Razvaljajte tamno tijesto na 5 mm. Izrežite trake iste širine kao svijetlo tijesto.
Napravite sendviče svijetlo tijesto-tamno tijesto-svijetlo tijesto
Dobivenu troslojnu traku prerežite na pola po dužini.
Umetnite vertikalno još jednu tamnu traku i spojite sa strana prerezano tijesto.
Omotajte prozirnom folijom svaku tako dobivenu traku i stavite u hladnjak na sat vremena.
* Možete slagati i obrnuto tijesta ako želite na primjer tamne "paketiće" sa svijetlom trakom.

Ohlađeno tijesto narežite na ploškice debljine oko 1 cm i složite ih na pleh (ne morate ih previše razmicati jer neće posebno narasti ni širiti se).
Od viška tijesta (tamnog za svijetle kekse, svijetlog za tamne kekse) izrežite kockice koje prerežite dijagonalno na trokutiće i stavite po dva na svaki keks tako da izgleda kao mašnica.
Pecite kekse na 180°C 15-ak minuta ili dok rubovi samo lagano ne porumene.
napomena: dok tijesto valjate nemojte ga previše brašniti (najbolje je razvaljati ga između dva komada papira za pečenje) jer vam onda slojevi neće htjeti prioniti jedan za drugi. Ako eventualno imate problema, premažite tijesto malo navlaženim kistom da se bolje zalijepi.

Pork Medallions with balsamic vinegar

$
0
0
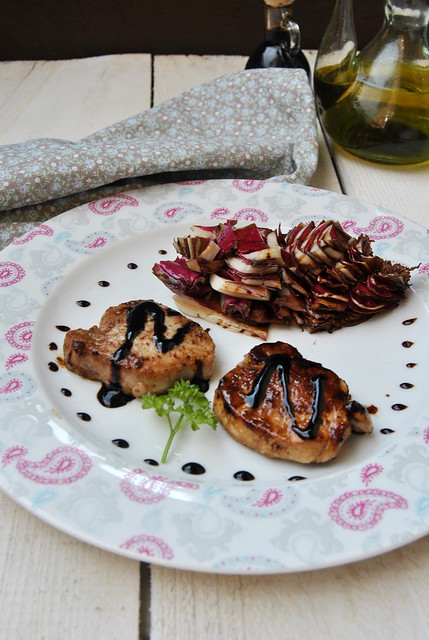
Pork Medalions with Balsamic Glaze


Two is a company, three is a crowd.
"Mom, could we spend some time together, but alone (ok, taking F. / the baby brother/ with us)? You know just to do things alone, you and me, like girls do - go shopping, go to the hairdresser's, have an ice cream or something like that?"
You'd think that the arrival of a new baby in a family would simply create a conflict towards the last one to arrive. Instead my two daughters seem to be both in love with their baby brother, but are rather jealous of each other.
The older one wants some time alone with me, without younger sister, the younger one doesn't want to go to preschool any more so she could be with her baby brother all the time.
I took them out for dinner yesterday, girls-alone, and we left our two boys at home watching football and drinking beer, free to make all the noises they wanted  ^__^ And, alone, they seemed to get along quite well. The girls I mean. The little guy was, of course, all thrilled to spend an evening with his father alone.
If I wanted I could apply the first sentence above to our dinners,  and I could not agree more. There are days when each and every member of my family expresses a different request for dinner. My answer is usually, OK, wait a second, guys, I'll just go out for a minute, open a restaurant and then come back to take your orders!!!
I can manage up to two different dinners, but more than that only if you want a sandwich (unless I forgot to make/buy bread ).
I thought that going with this tender and delicious cut of meat I could satisfy everyone's taste, but, hey! there's someone here who doesn't like their meat to be "so tender".
No matter what you do, you can never please everyone. But those of us who chose to enjoy their meal, got up with happy tummy after dinner.
It was also a week I enjoyed red radicchio a lot, in different dishes, like risotto, ravioli, etc. I just love it. That slightly bitter taste is simply great, especially when paired with Balsamic vinegar.

Now, for those of you who don't live in Modena or in Italy, anyway, you may not know the difference between the Balsamic vinegar of Modena and the Traditional Balsamic vinegar of Modena. The first type is the so called "commercial type", industrially produced balsamic vinegar, more or less available everywhere, at quite reasonable price.  And if you check the label you'll discover it's made from wine vinegar, cooked must and coloured with caramel, plus you may find other things added, too.  The traditional balsamic vinegar is different. Really different. The production starts with the cooked must to which some old balsamic vinegar is added and that's how the whole fermentation process starts and ends. Nothing else is added. The consistency, colour and thickness will change with aging - the older it is, the darker and more dense it gets.  Pay attention, no wine, vinegar or caramel is added. That's what you have to read on a label if buying a bottle of real Traditional Balsamic Vinegar.
For this dish I used some "normal", industrial vinegar for cooking, but added some aged, dense vinegar later for serving, adding some balsamic glaze (sauce) to the meat as well.


Grilled Red Radicchio with Balsamic Vinegar

Pork Medallions with Balsamic Vinegar

Medallions:
* 500-600 g pork tenderloin
* 2 TBspoons butter (or 1 TBspoon butter and 1 TBspoon EVOO)
* 2 TBspoons balsamic vinegar
* salt and pepper
*  flour
* Balsamic glaze or traditional (aged) balsamic vinegar (for serving)

Grilled red radicchio:
* 2 heads of red radicchio 
* extra virgin olive oil
* salt
* balsamic vinegar
* a few slices of pancetta (optional)

Slice the pork loin into 1,5 - 2 cm thick slices.
Season them with a little salt and pepper e flour on both sides shaking off the excess flour.

           Pork Medalions with Balsamic Glaze Pork Medalions with Balsamic Glaze

Warm up the butter (or butter and oil) in a large enough skillet to place all the meat in one layer and cook the meat on both sides until slightly golden.
Add the Balsamic vinegar and cook on low heat until the vinegar has evaporated.
Be careful not to overcook the meat or it will turn dry.
Just a few seconds before removing from heat add some finely chopped chive or parsley.
Serve immediately with a few drops of aged, traditional Balsamic vinegar or balsamic glaze sauce and salad as a side,  or try some grilled red radicchio as I did.

Clean the red radicchio and cut it in half or four. Season with salt and a little olive oil.
Preaheat the grilling pan and grill the red radicchio on all sides on medium heat, until it's got the grilling marks and has softened a little bit.
Remove from the pan, slice and season with extra virgin olive oil and balsamic vinegar.
If you like, toast some pancetta in a dry skillet until crunchy. Chop it and add it over the sliced and seasoned red radicchio.


Pork Medalions with Balsamic Glaze


Medaglioni di filetto di maiale con aceto balsamico


Medaglioni:
* 500-600 g di filetto di maiale
* 2 cucchiai di burro (o 1 di burro e 1 di olio EVO)
* 2 cucchiai di aceto balsamico
* sale e pepe
*  un po di farina per infarinare
* glassa al aceto balsamico o aceto balsamico tradizionale (per servire)

Radicchio rosso grigliato
* 2 radicchi rossi (tondi o lunghi)
* olio extra vergine d'oliva
* sale
* aceto balsamico
* un po' di pancetta 

Tagliate il filetto a fettine larghe 1,5-2 cm.
Condite le fettine con sale e pepe e infarinatele bene, scuotendo la farina in eccesso.
Scaldate il burro (o burro e olio) in una padella abbastanza larga per contenere tutte le fettine di carne e rosolatevi la carne su tutti e due lati.
Aggiungete l'aceto e cuocete sul fuoco dolce finché non sarà evaporato. Non cuocete troppo la carne per non farla diventare secca. 
Poco prima di togliere la carne dalla padella aggiungete un po' di erba cipollina o prezzemolo tritati.
Servite i medaglioni subito, con un filo di aceto balsamico tradizionale o la glassa al balsamico pronta.
Servite con un insalatina oppure con il radicchio grigliato.

Per il radicchio grigliato:
Pulite il radicchio dalle foglie brutte esterne e tagliatelo a metà o in quattro. Condite dal lato tagliato con sale e olio.
Grigliatelo su una piastra ben calda su tutti i lati.
Trasferitelo sul piatto, affettatelo e condite con l'olio e aceto balsamico.
Se vi piace, tostate qualche fettina di pancetta in una padella senza aggiungere grassi, fino a farla diventare croccante. Sbriciolatela sul radicchio affettato e condito.


Pork Medalions with Balsamic Glaze


Svinjski medaljoni s balzamičnim octom

Medaljoni
* 500-600 g lungića
* 2 žlice maslaca (ili 1 žlica maslaca i 1 žlica ulja)
* 2 žlice balzamičnog octa
* sol i papar
*  brašno
* umak od balzamika ili tradicionalni balzamični ocat za posluživanje

Crveni radič s grila
* 2 glavice crvenog radiča (okruglog ili duguljastog)
* maslinovo ulje
* sol
* balzamični ocat
* (dodatak) pancetta

Lungić narežite na komade debljine 1,5 do 2 cm.
Malo ih posolite i popaprite, pa uvaljajte u brašno.
Zagrijte maslac u tavi i popržite kratko medaljone s obje strane.
Dodajte balzamični ocat i pričekajte da ispari.
Nemojte prepeći meso jer će postati suho. U svakom slučaju stupanj pečenosti prilagodite svojem ukusu.
Par trenutaka prije nego ćete meso izvaditi iz tave dodajte sitno nasjeckan vlasac ili peršin.
Poslužite medaljone odmah dok su topli uz par kapi gustog, tradicionalnog balzamičnog octa ili glazuru od balzamika (gotovi umak na bazi balzamičnog octa).

Radič očistite od vanjskih listova. Operite ga, posušite i narežite na pola ili na četiri dijela (ovisno koliko su velike glavice.
Malo nauljite i ostavite da odstoji par minuta.
Zagrijte gril tavu i stavite peći polovice/četvrtine radiča, prvo stavite prerezanu stranu na tavu.
Potpecite tako sa svih strana. Premjestite na tanjur, posolite, polijte s malo maslinovog ulja i balzamičnog octa.
Ovako pripremljenom radiču možete dodati i hrskavo prepečenu pancettu - stavite tanke kriške na suhu tavu bez dodavanja masnoće i pecite s obje strane dok nije hrskava, krokantna, a zatim nakidajte na komadiće i dodajte narezanom i začinjenom radiču.

Pork Medalions with Balsamic Glaze

Hibiscus Flower Ice Cream

$
0
0

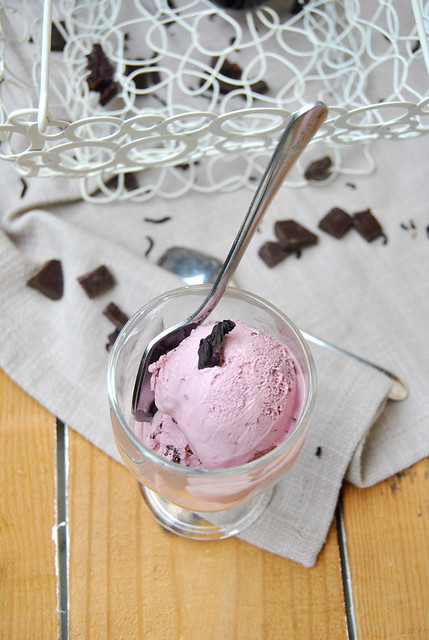
Pink Stracciatella - or Hibiscus Flower Ice cream bit chocolate bits

If my kids ever get tired of eating ice cream, it will be a sign there's something wrong.
And if they ever move from the classical flavours like chocolate and vanilla it will be kind of success
for me. So far I've been trying and trying, but enjoying new flavours on my own.
And yet, I thought that a pink coloured ice cream (naturally pink, of course) with tiny bits of crunchy chocolate would appeal to them. Wrong.
What matters is that spring seems to have arrived, not only according to the calendar. At least here.
Two days alredy with sun and more than pleasant 16°C. First flowers coming out fast all over the lawns. Kind of makes me feel better.
So, Hello spring!
Can I offer you a bowl of this delicious, pink ice cream? Don't tell me you're on diet  ^__^


Chocolate sauce


Hibiscus Flower Ice Cream with Chocolate Bits
(aka Pink Stracciatella)

* 4 dried hibiscus flowers
* 250 ml whole milk
* 250 ml heavy cream
* 100 g sugar
* 4 egg yolks
* 50 g sweetened condensed milk
* 1 TBspoon Cointreaua
* 70 g semisweet chocolate

Mix the milk and the cream in a saucepan, bring to a boil, add the dried hibiscus flowers, let simmer fot 1 minute, then remove from heat, cover and let infuse for 30 minutes.
Filter the infusion to separate the flowers (squeeze the flowers well). Bring the milk/cream mixture to a boil again.
In the meantime whisk the egg yolks and the sugar in a bowl. Add the hot milk, slowly and carefully, whisking the yolks all the time to prevent them from curdling.
Pour everything back into the saucepan and cook on low heat stirring constantly until the custard starts coating the back of the spoon or reaches 80-82°C.
Remove from heat immediately and pour the custard into a clean bowl placed in a slightly bigger one filled with cold water and ice.
Let the custard cool down to room temperature stirring it every now and then.
When the custard's cold, stir in the liquor and the condensed milk.
*Condensed milk may be omitted but I've noticed it makes ice creams creamier and it gets less hard once you freeze it. However, if you'd like to add it but also want less sweet ice cream or with the more pronounced  note from hibiscus flowers, reduce the sugar in custard.
Transfer the custard into the fridge for at least 4 hours, still better ovenight.
When the custard is well chilled pour it into your ice cream maker and churn according to the instructions.
In the meantime, melt the chocolate. When the ice cream is ready, with the machine still on, add the melted chocolate pouring it in a thin streak. The chocolate will harden immediately in contact with ice cream and break into small crunchy pieces.
Transfer the ice cream into a freezer safe container and freeze for a couple hours before serving.
Serve this ice cream plain or with chocolate sauce.


Pink Stracciatella - or Hibiscus Flower Ice cream bit chocolate bits


Gelato ai fiori di Karkadé (Ibisco)
(Stracciatella rosa)

* 4 cucchiai di fiori di karkadé secchi
* 250 ml latte intero
* 250 ml panna fresca
* 100 g zucchero
* 4 tuorli
* 50 g latte condensato zuccherato
* 1 cucchiaio di Cointreau o un'altro liquore all'arancia
* 70 g cioccolato fondente

Mettete la panna e il latte in un pentolino e portate a ebollizione. Aggiungete i fiori secchi di karkadé, abbassate il fuoco al minimo e lasciate sobbollire per  circa 1 minuto. Spegnete il fuoco e lasciate i fiori in infusione per 1/2 ora.
Filtrate il latte spremendo bene i fiori per far uscire più liquido possibile. Rimettete il latte sul fuoco e portatelo di nuovo a ebollizione.
Mescolate bene con una frusta a mano i tuorli con lo zucchero.
Quando il latte e di nuovo caldissimo aggiungetelo con molta attenzione ai tuorli versandolo a filo e mescolando i tuorli contemporaneamente.
Rimettete adesso tutto nel pentolino e sul fuoco. Cuocete la crema a fuoco dolce mescolando sempre finché non inizi a velare il cucchiaio o raggiunge la temperatura di 80-82°C.
Trasferitela subito in una ciotola pulita messa in una più grande contenente acqua fredda e ghiaccio.
Lasciate raffreddare la crema a temperatura ambiente, mescolandola ogni tanto.
Unite poi il liquore e il latte condensato, e trasferitela in frigo per almeno 4 ore, ancora meglio tutta la notte.
*Potete anche omettere il latte condensato, ma ho notato che rende il gelato più cremoso e successivamente meno duro quando congelato. Se volete il gelato meno dolce o vi piace sentire di più la nota acidula dei fiori di karkadé, ma volete aggiungere il latte condensato zuccherato, potete ridurre la quantità di zucchero nella crema.
Una volta ben raffreddata, versate la crema nella gelatiera e preparate il gelato secondo le istruzioni.
Nel frattempo spezzettate il cioccolato e fatelo sciogliere nel forno a microonde o a bagnomaria. 
Quando il gelato è pronto, senza spegnere la gelatiera, versate piano il cioccolato. Al contatto con il gelato freddo il cioccolato si indurisce subito e diventa croccantissimo. 
Trasferite il gelato in un contenitore adatto al freezer e congelatelo per un paio d'ore prima di servirlo.


Pink Stracciatella - or Hibiscus Flower Ice cream bit chocolate bits


Sladoled s cvjetovima hibiskusa
(ili Ružičasta stracciatella)

* 4 žlice suhih cvjetova hibiskusa (za čaj)
* 250 ml punomasnog mlijeka
* 250 ml slatkog vrhnja
* 100 g šećera
* 4 žumanjka
* 50 g zaslađenog kondenziranog mlijeka
* 1 žlica Cointreaua
* 70 g tamne čokolade

Stavite zagrijavati vrhnje i mlijeko. Kad prokuhaju, dodajte cvjetove hibiskusa, smanjite vatru na najnižu i ostavite da lagano kuha oko 1 minutu. Maknite s vatre, poklopite i ostavite da stoji 1/2 sata (povremeno promiješajte).
Nakon pola sata procijedite kroz gusto mrežasto cjedilo i dobro pritisnite cvjetove da iscijedite što više tekućine iz njih. Dobit ćete mješavinu mlijeka i vrhnja prekrasne ružičaste boje.
Stavite je da se opet zagrije do vrenja.
U međuvremenu pomiješajte u zdjeli žumanjke sa šećerom - ja ih samo dobro izmiješam pjenjačom.
Kad je vrhnje vruće dodajte ga postepeno u zdjelu sa žumanjcima, prvo žlicu po žlicu, a zatim ostatak u tankom mlazu, istovremeno miješajući smjesu pjenjačom da vam se jaja ne bi zgrušala.
Vratite sve u lonac i stavite kuhati na laganoj vatri dok se krema sasvim lagano ne zgusne, tj. da lagano pokriva poleđinu žlice kojom miješate ili ako imate termometar za hranu dok ne dostigne 80-82°C. Miješajte kremu cijelo vrijeme jer se jaja za čas zgrušaju ostavite li ih da se sama kuhaju ili ako ih previše zagrijete.
Gotovu kremu odmah ulijte u čistu zdjelu koju ste stavili u ledenu kupelj (malo veću zdjelu koju ste napunili hladnom vodom i ledom.
Povremeno promiješajte i ostavite da se potpuno ohladi na sobnoj temperaturi.
U potpuno hladnu kremu dodajte Cointreau (može i neki drugi liker na bazi naranče) i kondenzirano mlijeko. * kondenzirano mlijeko možete i izostaviti, ali iz mog iskustva vidjela sam da čini sladolede puno kremastijim i manje se stvrdnu kad stoje u zamrzivaču. Ako volite manje slatko, ili želite da se više osjeti kiselkasta nota cvjetova hibiskusa, a želite ipak dodati kondenzirano mlijeko, smanjite količinu šećera u kremi.
Poklopite posudu s kremom i stavite u hladnjak da se dobro ohladi, 3-4 sata, a još bolje preko noći.
Nakon što je krema odstajala i dobro se ohladila sipajte je u stroj za sladoled i pripremite sladoled prema uputama.
Dok se sladoled priprema, nasjeckajte čokoladu i otopite je u mikrovalnoj ili na pari.
Kad je sladoled već gotov, tj. dosta je gust i hladan, sipajte polako otopljenu čokoladu u tankom mlazu dok je stroj još u pokretu. Čokolada će se u dodiru s ledenom smjesom odmah stisnuti i dobit ćete prekrasno krckave komadiće čokolade. Premjestite odmah sladoled u posudu pogodnu za zamrzavanje i stavite u zamrzivač na par sati da se potpuno stisne. Ako vam sladoled stoji duže vremena u zamrzivaču, prije posluživanja ostavite ga oko pola sata u hladnjaku ili 10-15 minuta na sobnoj temperaturi.
*Ako nemate stroj za sladoled, kremu premjestite izravno iz hladnjaka u zamrzivač. Promiješajte je svakih 1/2 sata do sat tijekom prva 2-3 sata. Kad se sladoled malo stisnuo, dodajte čokoladu kao što je opisano gore (zamolite nekoga da vam miješa sladoled dok sipate čokoladu i tako vam glumi stroj za sladoled :D ).
Uživajte u ledenoj slastici.

Hibiscus flowers

A Soup.... and a Goodbye!

$
0
0
Chickpeas and Apple Cream of soup


Words just don't come easy.
Thoughts are still cluttered in my mind.
It is hard to believe, to accept the truth.
It is hard to put the thoughts and the words together without tears, without pain.
What I held to as a pillar in my life is gone and never will be back.
Never did I think that the three days at Easter would be the last three days together. And still I had to let him go. Had to let him find his piece and rest in my heart... forever.
...
I used to tell him I was his Sun... I used to wait for him to get back home from work, impatient to sit in his lap and every time told him: "You know, mummy didn't give me anyyyyyything to eat today!" just so I could stay in his lap and have dinner together.
...
It seems like ages have passed since those days and yet the years have gone by far too fast.
Part of my heart is locked now. It's where I want to keep jealously all the love my parents have given me. Both gone too soon. Both had so much life ahead to live, so much to share, so much love to give...
When I close my eyes I hear my daughter's words... Now grandma is not alone anymore, they will never separate again.
...

It is strange to sit now and go back to everyday petty things, food, writing. Does it really make sense?
My father was a person who enjoyed life, enjoyed good food.
It is for his memory that I don't want to stop writing on my blog. I know he would be proud of me. And many times still will I think, If only Daddy was here, he'd love this.
I wasn't given a chance to cook this for you, but I'm sure you would have loved it.
Love you, Daddy.
Love you, Mom.
Watch over us all...


Chickpeas and Apple Cream of soup


Chickpeas and Apple Cream of Soup


* 500 g precooked chickpeas
* 2 organic apples - Golden 
* 1 small onion
* 1/2 to 1 teaspoon turmeric spice
* about 1 liter vegetable stock
* extra virgin olive oil
* salt
* pink pepper corns
* fresh chive


Finely chop the onion and cook on low heat with 2 TBspoons EVOO until the onion is soft (a couple minutes).
Cut the unpeeled apples into small cubes.
Add the apple cubes to the pot with onion and saute together for 1 minute.
Add the drained chickpeas, the turmeric spice and a little salt.
Sautee shortly, then pour in the hot vegetable stock and bring to a boil.
Lower the heat, cover and cook for 20 minutes. Take a couple ladles of chickpeas and apple cubes and set aside, and puree the rest with a stick blender until smooth.
Adjust the density according to your taste (add a bit more stock if too dense, or let cook a bit more if too liquid).
Distribute the soup in four soup bowl and add part of the chickpeas and apples you set aside.
Sprinkle with crushed pink pepper corns and chopped chive.
Serve this soup warm.


Chickpeas and Apple Cream of soup


Vellutata di ceci e mela


* 500 g ceci precotti
* 2 mele Golden non trattate  
* 1 cipolla piccola 
* 1/2 o 1 cucchiaino di curcuma
* circa 1 litro di brodo vegetale
* olio extra vergine d'oliva
* sale
* pepe rosa in grani
* erba cipollina fresca


Tritate finemente la cipolla e cuocetela in una pentola con 2 cucchiai di olio extra vergine d'oliva a fuoco basso finché diventi morbida (un paio di minuti).
Tagliate le mela NON sbucciata a cubetti.
Aggiungete i cubetti di mela alla cipolla e lasciate insaporire per 1 minuto.
Unite i ceci scolati dal liquido, la curcuma e un po' di sale.
Lasciate insaporire brevemente, poi aggiungete il brodo caldo e portate a bollore. 
Cuocete il brodo per 20 minuti. Togliete circa due mestoli di ceci e cubetti di mela, e frullate il resto con un frullatore a immersione.
Aggiustate la densità della vellutata, se troppo densa aggiungete un'altro po' di brodo.
Distribuite la vellutata in quattro piatti o ciotole. Aggiungete in ogni piatto un po' di ceci e mele tenuti da parte.
Cospargete con pepe rosa schiacciato e l'erba cipollina tagliuzzata finemente.
Servitela calda.

Chickpeas and Apple Cream of soup


Krem juha od slanutka s jabukom

* 500 g kuhanog slanutka
* 2 jabuke Golden (po mogućnosti bio/neprskane)
* 1 manja glavica luka
 * 1/2 do 1 žličica kurkume
* oko 1 litra povrtnog temeljca ili vode
* maslinovo ulje
* sol
* ružičasti papar u zrnu
* svježi vlasac

Sitno nasjeckajte luk i pirjajte ga na laganoj vatri s 2 žlice maslinovog ulja dok ne omekša (par minuta).
Narežite neoguljenu jabuku na kockice.
Dodajte je u posudu s lukom i pirjajte skupa 1 minutu.
Dodajte ocijeđen slanutak, kurkumu i malo soli.
Pirjajte kratko, a zatim zalijte toplim temeljcem ili vodom i ostavite da zakuha.
Kuhajte oko 20 minuta. Izvadite 4-5 žlica slanutka i jabuka i ostavite sa strane, ostatak smrvite štapnim mikserom u kremu.
Podesite gustoću juhe po želji, tj. ako vam je pregusta dodajte još malo juhe.
Rasporedite juhu u četiri tanjura ili zdjelice. U svaki dodajte dio slanutka i jabuka koje ste ranije odvojili.
Pospite grubo smrvljenim ružičastim paprom i nasjeckanim vlascem.
Poslužite juhu toplu.

Uz ovu juhu možete poslužiti i kockice od integralnog kruha: 4-5 kriški integralnog kruha kojima ste odvojili koricu narežite na kockice. U tavi zagrijte 3 žlice maslinovog ulja i popržite kockice kruha sa svih strana. Malo ih posolite i popaprite. Maknite s vatre, pričekajte 1 minutu, a zatim ih pospite s 2 žlice sitno naribanog parmezana. Promiješajte i ostavite kruh da se ohladi prije nego ćete ga poslužiti uz juhu.

Chocolate Strudel with Pears and Ricotta

$
0
0

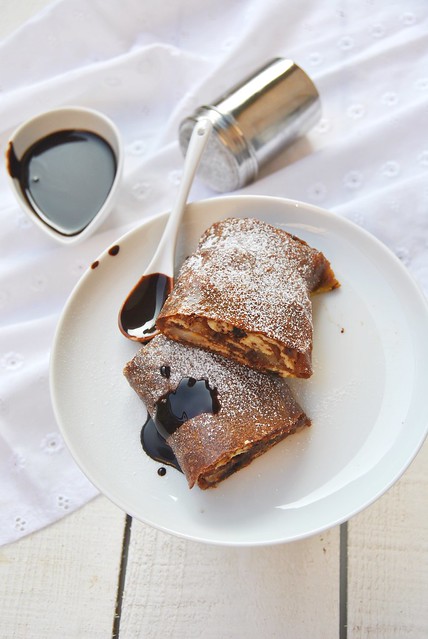
Chocolate strudel with pears and ricotta

My blog turned 4 at the end of March, but I completely forgot about it. And later didn't even have time to think about my blog anniversary.
But I, however, wanted to thank everyone who visits this blog, regularly or occasionally, leave a comment, cheer me up or console me when I need it. It's a virtual support, but it means a lot. So, a big Thank you! goes out to all of you, who know me personally and only virtually.
I'd lie if I told you I made a cake to celebrate, I didn't. But being quite a lazy blogger lately I have accumulated so many posts I'd want to share that it was just the question of picking one and writing the post about it. The photo and recipe archive has reached huge proportions already on my computer.
I'm a huge fan of strudels of all sorts. And when I come across an interesting idea I can't resist it.
The filling for this strudel was inspired by another recipe I prepared from Luca Montrersino's book Peccati al cioccolato, and the combo struck me immediately. I thought it would taste great wrapped in a chocolate phyllo dough, too.
And that was a bit of a challange. I made the simple phyllo, strudel dough plenty of times, but never thought of making it in chocolate version. Totally cool, totally delicious.
Actually, the strudel was so good, that I've been preparing psycologically to make it again ^__^
Yes, it takes a good mental training to be able to control oneself in front of a plate of this goodness. Unless you invite some friends over and share it. Now, that's a much better idea, don't be selfish, summer's just around the corner...


Chocolate strudel with pears and ricotta

Chocolate Strudel with Pears, Ricotta and Hazelnut Streusel

for phyllo dough:
* 250 g flour
* 2 žlice unsweetened cocoa
* 150 ml water
* 2 TBspoons milk
* 2 TBspoons oil (any delicate flavoured oil - olive/sunflower/corn or similar)
* a pinch of salt

Filling:
* 400 g pears (Abate fetel, ripe but firm)
* 30 g butter
* 40 g brown sugar
* 400 g ricotta
* 2 egg yolks
* 80 g sugar
* 1 teaspoon vanilla extract
* 75 g semisweet dark chocolate

Hazelnut streusel:
* 25 g ground hazelnuts
* 40 g flour
* 25 g sugar
* 25 g cold butter

for the dough:
Mix and sift together the flour, the cocoa and the salt into a mixing bowl.
Mix the water (room temperature or slightly lukewarm) and milk and add to the flour. Stir with a wooden spoon at first and when all the flour's been absorbed start kneading it. Transfer on a slightly floured kneading board and knead for 10 minutes or until you feel the dough is soft, elastic and doesn't stick to surface any more.
Divide the dough in two parts and form two balls. Leave them on a floured kneading board covered with a mixing bowl (turned upside down, as a bell). Let the dough rest at least 1/2 hour to 1 hour.
You can prepare the filling while waiting.

For the hazelnut crumbs, mix together the ground hazelnuts, the sugar and the flour. Add the cold butter, chopped and rub it in into the dry ingredients to get irregular crumbs. Place the mixture in the fridge until you need it.

Peel the pears and cut them into small cubes. Put them in a skillet with butter and brown sugar. Saute the pears until the liquid has evaporated and the pears are lightly caramelized.

Put the ricotta cheese into a mixing bowl, add the white sugar, the egg yolks, the vanilla extract and the finely chopped dark chocolate. Mix well to combine.
It's time to roll out the dough.
Cover the table with an old (clean) tablecloth and lightly sprinkle it with flour. Take one piece of the dough and roll it out with a rolling pin to the size of a plate. Oil the surface generously and put aside. Repeat with the second piece of the dough. Let them rest at least 15-20 minutes.
Now take the first part of the dough and lift it in the air with both your hands underneath. Start pulling it gently in the air and when it starts getting thin in the middle place it back on the table over the tablecloth. Place your knuckles underneath and pull the dough in all directions until it's rather thin, almost transparent.
You may find useful my old video HERE.


Chocolate strudel with pears and ricottaChocolate strudel with pears and ricotta

Using a fork distribute the cheese mixture over 2/3 of the dough in irregular clumps.
Distribute the pears over the cheese and then sprinkle the hazelnut crumbs all over.

Chocolate strudel with pears and ricottaChocolate strudel with pears and ricotta

Lifting the tablecloth roll up the dough. Cut it in two or three pieces to fit your baking pan.
Repeat the whole procedure with the second piece of the dough.

        Chocolate strudel with pears and ricotta   Chocolate strudel with pears and ricotta

You can brush the surface of the strudel with melted butter only before baking it, but if you want to make it even more delicious (and shiny) mix 1 dl of milk with 1 egg yolk and 15 g sugar. Brush generously the strudel with this mixture before baking it and 2 or 3 times during.
Bake the strudel in the oven preheated to 180°C for approx. 30 minutes.
Let it cool down, then cut it into pieces and dust with powdered sugar.
I found it irresistible while still slightly lukewarm with some chocolate sauce or ice cream.


Chocolate strudel with pears and ricotta

Strudel al cioccolato con pere, ricotta e streusel di nocciole

per la pasta filo:
* 250 g farina "0"
* 2 cucchiai di cacao amaro
* 150 ml acqua
* 2 cucchiai di latte
* 2 cucchiai di olio
* un pizzico di sale

Ripieno alle pere:
* 400 g pere (Abate, mature ma sode)
* 30 g butter
* 40 g zucchero integrale di canna
* 400 g ricotta
* 2 tuorli d'uovo
* 80 g zucchero
* 1 cucchiaino di estratto di vaniglia
* 75 g cioccolato fondente

Streusel di nocciole
* 25 g nocciole tritate
* 40 g farina
* 25 g zucchero
* 25 g burro freddo

Pasta:
Setacciate la farina insieme al cacao in una ciotola. Aggiungete un pizzico di sale. Mescolate l'acqua con il latte e unite alla farina, mescolando prima con una forchetta o cucchiaio di legno e poi impastando bene su una spianatoia per circa 10 minuti, fino a ottenere una pasta liscia, morbida e elastica.
Dividete l'impasto in due e formate due palline. Copritele a campana con la ciotola e lasciate riposare la pasta per un oretta.

Streusel alle nocciole:
Mescolate la farina, lo zucchero e le nocciole tritate. Aggiungete il burro freddo a tocchetti e strofinate con le dita per ottenere delle briciole. Mettete il composto in frigo fino al momento di usarlo.

Sbucciate le pere e tagliatele a dadini. Mettete le pere in una padella con il burro e lo zucchero di canna e cuocete a fuoco vivace mescolando fino a far caramellare leggermente le pere. Lasciatele raffreddare.

Mescolate la ricotta setacciata con lo zucchero, tuorli e la vaniglia. Aggiungete il cioccolato fondente tagliato a pezzettini.

Stendete la pasta: riprendete una pallina di pasta alla volta e stendetela un po' con un mattarello (alla grandezza di un piatto più o meno, o 1/2 cm di spessore). Versate un po' di olio e spalmatelo su tutta la superficie. Lasciate riposare i due dischi di pasta per 10-15 minuti prima di procedere con la stesura - la pasta si rilasserà e sarà molto più facile stenderla sottile.
Infilate le mani sotto un disco di pasta e alzatelo contemporaneamente cercando di allargarlo con le mani. Quando la pasta si è assottigliata al centro mettetela sul tavolo coperto con un canovaccio o una tovaglia leggermente infarinata e tirando molto delicatamente i bordi cercate di assottigliarla tutta. Eventualmente, alla fine, con un coltello ritagliate via i bordi troppo spessi.
Usando una forchetta distribuite il ripieno di ricotta su 2/3 di pasta stesa in maniera irregolare. Distribuite le pere nello stesso modo. Infine cospargete tutta la superficie della pasta con il streusel di nocciole. 
Naturalmente, avendo diviso la pasta in due parti, usate metà di ripieno per ogni uno.
Alzando il canovaccio/tovaglia arrotolate la pasta (partendo dalla parte con le pere andando verso il lato con solo il streusel).
Tagliate il rotolo alla lunghezza della teglia e sistemate i tronchetti sulla teglia coperta con la carta di forno e leggermente unta di olio.
Potete spalmare la superficie dei strudel con soltanto burro fuso, ma per renderlo ancora più gustoso mescolate 1 dl di latte con un tuorlo e 15 g di zucchero, spalmate lo strudel molto abbondantemente prima di infornarlo e ancora 2 o 3 volte durante la cottura. 
Infornate lo strudel nel forno già caldo a 180°C per circa 30 minuti.
Lasciatelo raffreddare e poi tagliate a pezzi, cospargete con lo zucchero a velo e servite. 
A me è piaciuto tantissimo quando era ancora tiepido, ma anche freddo è sempre buono.


Chocolate strudel with pears and ricotta

Čokoladna savijača s ricottom, kruškama i lješnjacima

za vučeno tijesto:
* 250 g brašna
* 2 žlice gorkog kakaa
* 150 ml vode
* 2 žlice mlijeka
* 2 žlice ulja
* prstohvat soli

Nadjev:
* 400 g krušaka
* 30 g maslaca
* 40 g smeđeg šećera
* 400 g ricotte (ili običnog svježeg kravljeg sira)
* 2 žumanjka
* 80 g šećera
* 1 žličica ekstrakta vanilije
* 75 g tamne čokolade

Mrvice s lješnjacima:
* 25 g lješnjaka
* 40 g brašna
* 25 g šećera
* 25 g hladnog maslaca

Tijesto:
Prosijte brašno i kakao skupa u zdjelu. Umiješajte prstohvat soli.
Pomiješajte vodu i mlijeko pa dodajte u zdjelu s brašnom i zamijesite meko i elastično tijesto.
Mijesite ga na radnoj površini 10-ak minuta, jer što dulje mijesite tijesto to će se bolje razviti gluten i tijesto će biti elastičnije kasnije kad ga budete razvlačili.
Po želji ostavite jednu jufku ili podijelite na dva dijela za dvije manje jufke.
Ostavite pokriveno da odmori pola sata do sat (ja obično pokrijem tijesto preokrenutom zdjelom, tako se ne osuši).

Za mrvice: pomiješajte brašno, šećer i mljevene lješnjake.
Dodajte na kockice narezan hladan maslac pa ga prstima utrljajte u suhe sastojke da dobijete grubu, mrvičastu smjesu.
Ostavite u hladnjaku do upotrebe.

Kruške očistite i narežite na kockice.
Stavite ih u tavu, dodajte maslac i smeđi šećer pa pirjajte miješajući dok ne ispari tekućina i kruške se lagano karameliziraju.
Ostavite ih da se prohlade.

Pomiješajte propasirani sir (ricottu) sa šećerom, žumanjcima i vanilijom (umjesto ekstrakta možete staviti sastrugane sjemenke 1/4 mahune ili vanilin šećer).
Čokoladnu sitno nasjeckajte nožem, pa i nju umiješajte u smjesu od sira.

Razvlačenje tijesta:
Uzmite jufku, stavite je na malo pobrašnjen stolnjak i oklagijom razvaljajte na otprilike 1/2 cm debljine. Namažite obilno uljem i ostavite da opet odmori 15-ak do 20 minuta (ako radite dvije manje jufke, napravite isto s drugim dijelom).
Podvucite ruke ispod tijesta i počnite ga malo razvlačiti u zraku (ako je tijesto mekano samo će se početi razvlačiti pod svojom težinom), koliko možete. Položite ga zatim na stolnjak i vucite krajeve dok se tijesto ne rastanji dovoljno (po želji odrežite zadebljale krajeve).
Nanesite nadjev od sira do 2/3 razvučenog tijesta - vilicom rasporedite nepravilne hrpice.
Preko sira rasporedite kruške.
Pospite sad mrvičastu smjesu s lješnjacima preko cijele površine razvučenog tijesta.
Uz pomoć stolnjaka zarolajte tijesto počevši od kraja sa sirom i kruškama.
Izrežite na komade dužine pleha u kojem će se peći i stavljajte na pleh obložen malo namaštenim papirom za pečenje.
Premažite savijaču uljem ili otopljenim maslacem, a ako želite posebno ukusan premaz od kojeg će vam savijača ujedno biti sjajna, pomiješajte 1 dl mlijeka, s 1 žumanjkom i 15 g šećera. Premažite obilno savijaču prije pečenja i još dvaput tijekom pečenja (u razmaku od 10 minuta).
Stavite peći savijaču u pećnicu zagrijanu na 180-200°C oko 30 minuta (pazite da vam ne izgori jer budući da je tijesto tamno teže je procijeniti boju pri pečenju).

Ostavite savijaču da se prohladi, izrežite na komade, pospite po želji šećerom u prahu i poslužite.

Meni je najbolja kad se tek ohladi i još je malo mlačna.


Chocolate strudel with pears and ricotta

Quinoa, Chickpeas and White Beans Falafel

$
0
0
Quinoa, Chickpeas and White Beans Falafel

There are times when I feel like I was born ages ago... Well time is relative, and for my daughters my 40 years really ARE ages. But to think of the times when I grew up and see my children now, I honestly don't know what to say. Being a parent today is made more difficult by too many different things, too many influences children are exposed to. I can't even define everything and sometimes I feel like a goose in the fog, just hoping I won't lose my way.
Like, for example, a little "surprise" the other night - my daughter put a sign on our bedroom door saying: Do not enter. This room will be occupied by me for the next 20 days.
What caused this? a punishment for her misbehaviour: no after-school-visits to friends' house!
Luckily we resolved the "siege" but a doubt remains: are these the first signs of not-so-far adolescent rebellion? And to think I'll have to deal with that probably three times. Because the 6-year-old is not joking either.
I better stick to my pots and pans, and rather cause some food related rebellion.
Because that's what hear ofter at home: Mom has forgotten how to cook "normal" food. Or even better: Mom cooks for everyone else, but for us! Now that's really tops!

How much I love chickpeas is obvios from the number of recipes featured on my blog. I love its sweetness, I love to give it different forms and shapes, and it's simply aways welcome on my table.
Normally, I'm sure you have all once tried or at least seen recipes for it, falafel is made with chickpeas only. Some recipes call for precooked, some for chickpeas that have only been soaked overnight.
Well this recipe is a bit different. Apart from chickpeas there are white, cannellini, beans, too, plus the quinoa seeds, so dear to me as well. So, I knew, even at first glance, that I'd love this, a bit unusual variation on the classical recipe.
The first time I made them, I had a slight problem with the sesame salsa. Once I added the lemon (all at once) it turned into a solid mixture floating in the oil. And no way to break that. So I tried adding the lemon juice gradually and got a perfect result, a creamy salsa that goes really nicely with the falafel.
Another piece of advice. Definitely let the falafel mixture rest in the fridge, because only then will you get the maximum of flavors to stand out. I made a few for lunch and since I was in a hurry I didn't let the mixture rest at all. The remaining mixture rested in the fridge until dinner and it tasted much better.

Quinoa, Chickpeas and White Beans Falafel

Quinoa, Chickpeas and White Beans Falafel
(from Cucina naturale magazine)

* 200 g precooked chickpeas
* 200 g precooked cannellini beans (white beans)
* 100 g quinoa
* 1 egg
* 1 carrot
* 1 leek
* 1 clove of garlic
* fresh parsley
* a little chickpeas flour
* salt and pepper
* 1 teaspoon of powdered cumin
* 1 teaspoon of powdered coriander seeds

Umak od sezama
* 1 češanj bijelog luka
* 3 žlice maslinovog ulja
* 60 g tahinija
* 1 limun
* sol i papar

Bring 300 ml of water to a boil. Add the quinoa, previously rinsed well with cold water. Lower the heat to minimum and cook until the quinoa has absorbed all the water. Stir every now and then to check.
Spread the cooked quinoa on a large plate and let it cool.
Put the carrot, the leek, the garlic and the parsley in a food processor. Process until everything is finely chopped.
Add the drained chickpeas, the cannellini beans, the egg, the salt and pepper, the cumin and the coriander. Process shortly to mix well.
Add the quinoa and  process once more to get a homogeneous mixture. If it should be too soft and wet, add some chickpeas flour.
Cover the falafel mixute and refrigerate for at least 10 minutes (I leave it for hours sometimes).
Take spoonfulls of falafel mixture and shape it into little balls. Roll them in chickpeas flour and then flatten slightly.
Heat 2-3 tablespoons of Extra virgin olive oil and fry the fallafel on medium heat for 2-3 minutes on each side, or until golden.

for the sesame salsa, mash the garlic with 1 TBspoon olive oil in a mortar. Add the tahini paste and the rest of the oil. Mix well and then add the freshly squeezed lemon juice, little at a time, adjusting the quantity to your taste.
Serve the sesame salsa with the falafel.


Quinoa, Chickpeas and White Beans Falafel

Falafel con ceci, cannellini e quinoa
(dalla rivista Cucina naturale)

* 200 g ceci cotti
* 200 g fagioli cannellini cotti
* 100 g quinoa
* 1 uovo
* 1 carota
* 1 porro
* 1 spicchio d'aglio
* qualche rametto di prezzemolo
* un po' di farina di ceci
* sale e pepe
* 1 cucchiaino di cumino in polvere
* 1 cucchiaino di coriandolo in polvere

Salsa al sesamo
* 1 spicchio d'aglio
* 3 cucchiai di olio extravergine d'oliva
* 60 g tahini
* 1 limone
* sale e pepe

Portate 300 ml di acqua a ebollizione. Versatevi la quinoa precedentemente messa in un colino a maglie strette e sciacquata bene con l'acqua fredda. Abbassate il fuoco al minimo e lasciate cuocere la quinoa nella pentola coperta  fino ad assorbire tutta l'acqua, ogni tanto girate per controllare. 
Stendete la quinoa cotta su un piatto e lasciatela raffreddare.
Tritate la carota, il porro, l'aglio senza germoglio e il prezzemolo nel robot da cucina molto finemente. 
Unite i ceci e i fagioli scolati dal liquido, l'uovo, sale, pepe, il coriandolo e il cumino e frullate di nuovo tutto per qualche secondo.
Unite la quinoa e azionate di nuovo il robot per mescolare bene tutto.
Se il composto dovesse risultare troppo morbido aggiungete un po di farina di ceci.
Coprite e lasciate riposare in frigorifero per almeno 10 minuti (io lo lascio anche per qualche ora).
Prelevate il composto con un cucchiaio e formate delle palline. Rotolatele nella farina di ceci e appiattitele un po'.
Scaldate 2-3 cucchiai di olio EVO in una padella e cuocete i falafel per 2-3 minuti su ogni lato a fuoco medio.
Lasciateli scolare sulla carta da cucina e serviteli caldi.
Per la salsa al sesamo, schiacciate l'aglio (senza germoglio) con 1 cucchiaio di olio EVO in un mortaio. 
Unite la tahina e poi il restante olio. Mescolate bene e poi unite gradualmente il succo di limone (consiglio di aggiungerlo poco alla volta e di dosarlo secondo il proprio gusto). Salate e pepate la salsa. Servitela con i falafel.


Quinoa, Chickpeas and White Beans Falafel

Razveselilo me je kad sam vidjela da je ovaj mjesec tema u igrici Ajme koliko nas je slanutak. Meni jedna od najdražih mahunarki/leguminoza. Primijetit ćete to i ako prošvrljate blog u potrazi za receptima. Od predjela, preko juhe, do focaccie. Nedostaje mi samo desert, ali i to ćemo uskoro ispraviti. 
Dakle s ovim receptom za malo neobični falafel u kojem su mjesto pored slanutka našli i grah i qinoa, sudjelujem u ovomjesečnom krugu igrice, čija je domaćica Tanja s bloga Kuhinja zaposlene žene .
Osim ovog recepta pridružujem i starije recepte s bloga.


Falafel s quinoom, slanutkom i grahom
(iz časopisa Cucina naturale) 

* 200 g kuhanog slanutka
* 200 g kuhanog bijelog graha (cannellini)
* 100 g quinoe
* 1 jaje
* 1 mrkva
* 1 poriluk
* 1 češanj bijelog luka
* par grančica peršina
* po potrebi brašno od slanutka
* sol i papar
* 1 žličica kumina u prahu
* 1 žličica korijandera u prahu

Umak od sezama
* 1 češanj bijelog luka
* 3 žlice maslinovog ulja
* 60 g tahinija
* 1 limun
* sol i papar

Stavite 300 ml vode da prokuha, dodajte quinou koju ste prethodno stavili u cjedilo i dobro isprali pod mlazom hladne vode. Smanjite vatru na minimum i kuhajte poklopljeno dok quinoa ne upije svu vodu.
Istresite kuhanu quinou na tanjur i raširite da se ohladi.
U električnu sjeckalicu (multipraktik) stavite mrkvu i poriluk narezane na komade, peršin i bijeli luk kojem ste odstranili zelenu klicu i usitnite sve što finije.
Dodajte ocijeđeni slanutak i grah, jaje, kumin, korijander, sol i papar pa opet izmiksajte par sekundi.
Dodajte na kraju quinou i izmiksajte u kratkim intervalima, po želji miksajte dok ne dobijete homogenu smjesu ili ostavite da se osjeti quinoa unutra.
Ako je smjesa prerijetka/premekana dodajte par žlica brašna od slanutka.
Pokrijte smjesu i ostavite u hladnjaku barem 10-ak minuta (ja je ostavim hladiti i po nekoliko sati jer se onda okusi bolje prožmu).
Kad je smjesa odmorila u hladnjaku grabite je žlicom i oblikujte rukama kuglice.
Uvaljajte ih u brašno od slanutka i malo samo spljoštite.
Zagrijte 2-3 žlice maslinovog ulja u tavi i pržite falafel na srednje jakoj vatri 2-3 minute sa svake strane da dobiju zlatno smeđu boju.
Vadite ih na nekoliko slojeva kuhinjskog papira da se ocijedi masnoća.
Poslužite ih tople (ali nisu loši ni hladni).
Uz ove kuglice možete poslužiti umak od sezama:
Usitnite u mužaru 1 češanj češnjaka (odstranite mu klicu) sa žlicom maslinovog ulja i prstohvatom soli.
Dodajte 60 g tahina i još 2 žlice maslinovog ulja pa dobro izmiješajte pjenjačom.
Dodajte po ukusu sok od 1/2 do 1 cijelog limuna.
Posolite i popaprite po ukusu.

Potato Gnocchi with Chickpeas Flour

$
0
0

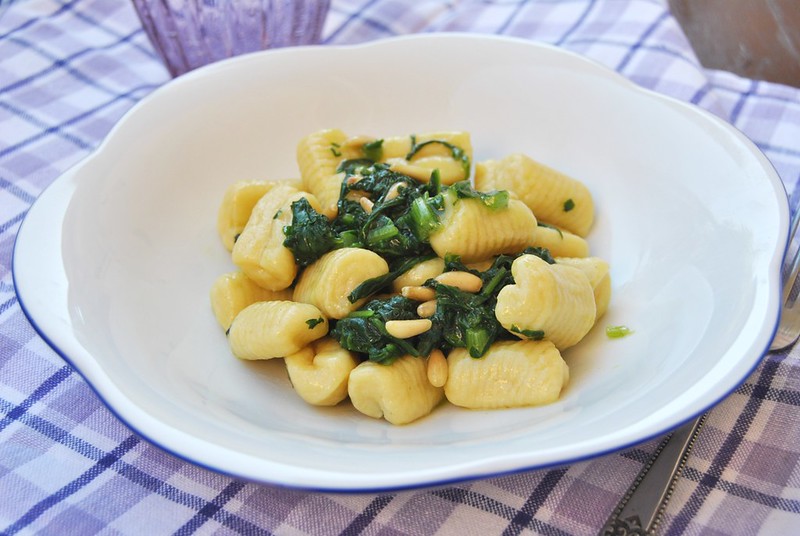
Potato Gnocchi with Chickpeas Flour

When it comes to potato gnocchi, I'm a minority at my home (like with so many other things). To say the truth, the industrial ones are not on my LIKE list either.  But the home made ones are whole another story.
It takes a little time, but it's worth the effort.
Especially because they freeze well and in my case make an excellent solution for those days when I'm alone at home at lunch time and don't want to slave over the stove for a one person meal.
Just pull the bag out of freezer and throw a necessary quantity into boiling water, time to cook them and the seasoning is ready as well.
This version with chickpeas flour is so delicious and nutricious, healthy, glutten free and with lower glicemic impact than the classical gnocchi recipe.  I particularly loved the sweet flavour of chickpeas flour in gnocchi. And they fit so well with the Swiss chard and pine nuts that I didn't even consider seasoning them in any other way. The original recipe suggests spinach, but I had Swiss chard in my garden and I was able to use very fresh, young and delicate leaves, so I thought they were much better than the store-bought, ugly and hard spinach leaves. And I have, honestly, learned to like Swiss chard much better then spinach over the last years.
My garden patch is all green again as my Swiss chard plants not only survived last winter but also spread all over. So I'm looking forward really to make these gnocchi again.
And you, would you give them a try?

Potato Gnocchi with Chickpeas Flour

Potato Gnocchi with Chickpeas Flour

* 1/2 kg of potatoes
*  about 180-200 g chickpeas flour
* 1 egg
* salt
To season:
* 250 g of spinach or baby swiss chard
* 1 spoonful of pine nuts
* 1 clove of garlic
* Extra virgin olive oil
* salt

Wash the potatoes carefully and put them in a pot with cold water. Cook them for approx. 40 minutes or until done (depends on the type and size of your potatoes).
Peel the potatoes while still warm and mash them using a potato ricer.
Let the potatoes cool a little, and then add the egg, a pinch of salt and the flour.
Start mixing with a wooden spoon and then continue with your hands.
Add the flour as necessary because it will depend a lot on the type of poatoes used - if they are watery they will absorb more flour. However, the dough shoudn's be either too soft and sticky, nor too hard. But you should be able to work with it and shape gnocchi without it sticking too much. Do not knead the dough more than necessary or your gnocchi will have gummy texture.

                            Potato Gnocchi with Chickpeas Flour       Potato Gnocchi with Chickpeas Flour     

Take a small piece of dough, roll it into approx. 1 cm thick sausages.
Cut them into 1,5 cm long pieces.
While working with this dough, keep both the kneading board and the dough well floured.
To shape gnocchi, take one piece of the dough, press it with your thumb against the gnocchi board (or a fork if you don't have one) and roll, you'll get an indentation on one, and striped pattern on the other side.
Once shaped, place the gnocchi on a floured, cardboard tray.
You may cook them immediately or freeze for later use (freeze them on a tray and then transfer into a zip lock freezer bag).
When cooking frozen gnocchi, there's no need to thaw them first - throw them still frozen into boiling water, one portion at a time.
        
  Potato Gnocchi with Chickpeas Flour  Potato Gnocchi with Chickpeas FlourPotato Gnocchi with Chickpeas Flour

To season the gnochi, put oil, the whole, just slightly crashed, clove of garlic and the pine nuts into a skillet and warm up over a medium heat. Add the spinach or swiss chard (I used young and soft swiss chard leaves), salt and cook on high for 2-3 minutes until the greens are soft.
In the meantime bring a large enough pot of water to a boil, add salt and throw in the gnocchi.
The gnocchi are done when they float up to the surface.
Take them out with a slotted spoon and add directly to the skillet with the spinach/swiss chard and pine nuts, adding a little cooking water as well. Stir and heat everything together.
Serve immediately while still warm.

Potato Gnocchi with Chickpeas Flour

Gnocchi di patate industriali non mi piacciono per niente. Ma, fatti in casa sono tutta un'altra storia. Se in più vi piace il sapore dolciastro della farina di ceci, ve li consiglio vivamente.
Sono deliziosi, sono senza glutine, e con l'impatto glicemico più basso rispetto i classici gnocchi di patate.
Il condimento, spinaci o nel mio caso erbette insieme ai pinoli, si sposa perfettamente con questi gnocchi. Da provare assolutamente.
La ricetta, come spesso avviene su questo blog, viene dalla rivista Cucina naturale.

Gnocchi di patate con farina di ceci

* 1/2 kg di patate
*  circa 180-200 g di farina di ceci
* 1 uovo
* sale
 per condire:
* 250 g di spinaci o erbette (puliti)
* 1 cucchiaio di pinoli
* 1 spicchio d'aglio
* Olio extra vergine d'oliva
* sale

Lavate bene le patate senza sbucciarle e mettetele a cuocere in una pentola partendo dall'acqua fredda (ci vorranno più o meno 40 minuti).
Una volta cotte, sbucciate le patate e schiacciatele con lo schiacciapatate.
Lasciatele raffreddare un po', poi aggiungete l'uovo, un pizzico di sale e la farina. La quantità di farina dipende molto dal tipo di patate, se sono molto acquose ci vorrà un po' di più, partite con 180 g e poi vedete se serve altra. L'impasto comunque non deve risultare ne troppo molliccio ne troppo duro, ma abbastanza sodo da poter formare i gnocchi senza che si attacchino al tavolo o alla tavoletta per i gnocchi.
Impastate la pasta prima con un cucchiaio di legno e poi procedendo con le mani. Evitate di impastare troppo a lungo, perché i gnocchi risulteranno  gommosi.
Staccate pezzetti di pasta e formate dei rotolini di diametro circa 1 cm.
Tagliateli a pezzettini lunghi 1,5 cm.
Tenete il piano di lavoro e la pasta sempre ben infarinati per evitare che la pasta si attacchi.
Formate i gnocchi mettendo un pezzetto di pasta sulla tavoletta per i gnocchi, premetelo con il pollice e  poi rotolatelo un po' formando cosi un incavo al interno e le classiche righe dall'altro lato.
Al posto della tavoletta si può usare semplicemente una forchetta.
Una volta formati, sistemate i gnocchi su un vassoio di carta infarinato.
Potete cuocerli subito oppure congelarli - congelateli prima sul vassoio e poi trasferiteli nelle bustine da freezer. Non occorre scongelarli prima di cuocerli, ma buttarli direttamente nell'acqua bollente, non tutti insieme, ma una parte alla volta.

Scaldate l'olio in una padella con lo spicchio d'aglio intero, soltanto un po' schiacciato, e i pinoli per un 1 minuto circa.
Aggiungete i spinaci/erbette, salate e cuocete a fuoco vivace per 2-3 minute.
Mettete a cuocere i gnocchi nel abbondante acqua salata. Sono pronti quando si alzano in superficie.
Prendeteli con un mestolo forato e aggiungete direttamente nella padella con il condimento insieme a un po' di acqua di cottura.
Saltate brevemente tutto insieme e servite i gnocchi caldi.


Potato Gnocchi with Chickpeas Flour

Nitko osim mene u obitelji ne voli njoke/valjuške od krumpira. Nosić frkću i na sam spomen. Ali to nije razlog da ih sebi ne spremim s vremena na vrijeme. Ni ja nisam bila nešto posebno oduševljena onim industrijskim, ali od kad mi je moja susjeda donijela domaće promijenila sam mišljenje. To je sasvim druga priča.
Posebno su mi se svidjeli u ovom receptu s brašnom od slanutka. Slatkasti okus slanutka me je oduševio zbilja. Da i ne govorim koliko mi se svidjela kombinacija s blitvom i pinjolima. Savršeno. Recept je zapravo predviđao špinat, ali kako sam ja u vrtu cijelo prošlo ljeto imala blitvu, mogla sam odabrati zbilja mlade, mekane listove i sigurno su bili ukusniji od špinata koji bih morala kupiti.
Isprobajte ih svakako - ukusni su, bez glutena, i imaju niži glikemijski indeks of klasičnih njoka s pšeničnim brašnom.

Iako je već prvi dan svibnja, i sigurno ćemo uskoro saznati i novu temu za igricu Ajme koliko nas je, htjela sam dodati još i ovaj recept Tanji s bloga Kuhinja zaposlene žene (ako me prihvaća ;) za travanjski krug u kojem je tema bila Slanutak/leblebija.

Njoki od krumpira sa slanutkovim brašnom

* 1/2 kg krumpira
*  oko 180-200 g brašna od slanutka (plus dodatno za mijesiti)
* 1 jaje
* sol
 za posluživanje:
* 250 g špinata ili mlade blitve (očišćeno)
* 1 žlica pinjola
* 1 češanj bijelog luka
* ekstra djevičansko maslinovo ulje
* sol

Krumpir dobro operite i skuhajte u ljusci (ovisno o veličini trebat će vam oko 40 minuta).
Ogulite kuhan krumpir i propasirajte ga.
U prohlađen krumpir dodajte jaje, brašno i malo soli.
Zamijesite tijesto (prvo kuhačom, a zatim rukama).
Dodajte po potrebi brašna (ovisi dosta o vrsti krumpira koliko će brašna upiti), tako da je tijesto mekano, ali se ne lijepi i dopušta vam oblikovanje njoka.
Kidajte komadiće tijesta, oblikujte ih u rolnice debljine oko 1 cm.
Izrežite rolnice na komadiće od otprilike 1,5 cm.
Neka vam daska i tijesto budu uvijek dobro pobrašnjeni da se tijesto ne lijepi.
Oblikujte njoke tako što ćete svaki komadić palcem pritisnuti na daščicu i onda lagano zarolajte, formirajući udubljenje s jedne strane i tipične ureze s druge.
Ako nemate daščicu za njoke poslužit će na isti način vilica.
Oblikovane njoke slažite na dobro pobrašnjen pladanj.

Zagrijte u tavi maslinovo ulje s cijelim, malo zgnječenim češnjem bijelog luka i pinjolima otprilike 1 minutu.
Dodajte nasjeckan špinat/blitvu, posolite i propirjajte na jačoj vatri miješajući, 2-3 minute.
Skuhajte njoke u ključaloj posoljenoj vodi.
Kad isplivaju na površinu, gotovi su.
Vadite ih šupljikavom žlicom i dodajite izravnu u tavu sa špinatom/blitvom, tako da s njokima dodate i malo vode u kojoj su se kuhali.
Zagrijte sve skupa kratko, miješajući pažljivo i poslužite toplo.

* njoki dobro podnose i zamrzavanje. Zamrznite ih posložene na pladanj, a zatim premjestite u vrećice.
Kuhajte kao i svježe, s tim da ih stavite kuhati neodmrznute i ne stavite kuhati odmah sve, već po manju količinu da se temperatura vode ne bi previše snizila, time biste dobili ljepljive njoke.

Sweet Six Berrilicious Party

$
0
0


Chocolate and Almond Cake

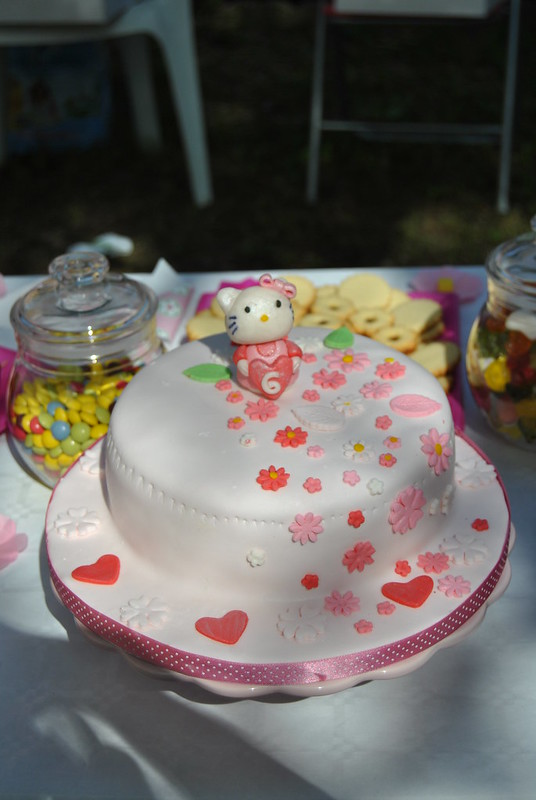
My little pumpkin turned six last Friday and to my surprise asked for a Hello Kitty birthday cake.
She actually wants Hello Kitty to star all her birthday cakes forever... I'll ask her again in a couple years.

DSC_1075

 I'm a last minute person, and although the cake design was ready in my head for weeks, the cake was done
in a very short time, and in a hurry. But I think the smile on her face says it all.

DSC_1078

And what was hiding beneath the marshmallow fondant?
Check it out for yourself...

Chocolate and Almond Cake

A Chocolate almond cake with Dark chocolate pastry cream.
A creamy goodness that can please only real chocolate lovers... and my little Hello Kitty fan usually is...
but this time she ate only the MMF decorations. It was a bit sad to see the poor Kitty lose her head.

Chocolate and Almond Cake

The birthday party will actually take place this weekend and I'm considering it just a trial cake.
Some improvements will be necessary... I don't know why, but I'm rarely 100% satisfied with my cakes.

Chocolate and Almond Cake

The choice of colours wasn't random. Here's the rest of decorations I'm preparing. You can see the whole Sweet Berrilicious collection HERE (free download)
And I'll be (hopefully) back with more pictures in a few days... if I survive...

Sweet Berrilicious Collection

Happy Birthday, Momy's Sweet Little Berry

Chocolate, Almond, Dulce de Leche Cake

$
0
0
Hello Kitty - Chocolate, Almond, Dulce de Leche Cake

So, how did the birthday party go? I'd say GREAT!
Kids had so much fun, they loved the cake... they loved the fact they could run around the garden... My daughter was really thrilled about everything.
And the most important thing, now that it's over, I can get some well deserved rest  ^_^

Chocolate, Almond, Dulce de Leche Cake

As usual, I took another bite bigger than my mouth. I was overwhelmed with everything, kids, and lots of things to do besides the birthday party. But it was fun and although lots of ideas were not realized in the end, like macarons, and some other cute stuff etc. and despite the fact that my printer decided to go on strike just the day before the party, so some of the decorations never got to be printed, I'm glad I tried at least. I've learned from my mistakes, and I know that the next party will be one step closer to perfect.

This time I'm leaving you the recipe for the cake I made, too. I told you I wasn't 100% satisfied with the first one, so I improved it, changed it, made it prettier.  It took me almost three days to write it, much longer than to make it. That's one of the reasons why I don't share recipes for cakes often.
But I have to say that the cake hit the spot. It looked great, it tasted heavenly, and for the first time in a very long time, I had a hard time saving at least one slice to take a photo.
I got tu run now, lots of things to do today, but I'm leaving you in sweet company.

Chocolate, Almond, Dulce de Leche Cake

Chocolate, Almond, Dulce de Leche Cake

Cake:
* 245 g TPT (sugar and almonds 50:50)*
* 100 g whole eggs
* 50 g egg yolks
*  70 g all purpose flour
* 30 g unsweetened cocoa
* 225 g egg whites
* 80 g sugar

Milk chocolate cream:
* 150 g good quality milk chocolate
* 150 g sweetened condensed milk
* 90 g butter
* 90 g cream cheese (Philadelphia classic)

White chocolate cream:
* 150 g good quality white chocolate
* 150 g sweetened condensed milk
* 90 g butter
* 90 g cream cheese (Philadelphia classic)

Dulce de leche cream:
* 175 g dulce de leche
* 250 g heavy cream with 35% m.f.
* 4 g powdered agar agar
* 50 g butter

*TPT (Fr. tant pour tant)  is a mixture of blanched almonds and sugar, you can prepare it by grinding the same quantity of almonds and sugar in a food processor, or mix almond meal with fine caster sugar (or powdered sugar).
**Before you start, prepare four sheets of baking paper. Draw 22-24 cm circles on each and cut out little wider than that, so that you have 3-4 cm margines.
Turn your oven on to 200°C.

Put the whole eggs, the egg yolks and the TPT into a mixing bowl and beat with an electric mixer until thick and pale.
Contemporarily with another mixer whip the egg whites with sugar until stiff.
Mix and sift together the flour and the cocoa.
Add the flour mixture to the batter alternating it with the egg whites. Mix them in using a hand whisk, delicately and slowly, with up and down movements, scraping the bottom.
Divide the batter into 4 equal parts - it may seem complicated, but I made it easier by weighing the mixing bowl before I started, and then in the end with the batter in it to calculate the batter weight and then simply divided it in 4 by weight.
Spread 1/4 of the batter onto a prepared sheet of baking paper placed on a baking sheet.
Bake in a preheated oven for 5-7 minutes. Remove from the oven and let it slide on the table. After one minute remove the cake from the baking paper and place it on a cooling rack to cool.
Proceed baking the remaining three cake layers.

For the chocolate cream, place the chopped chocolate, the condensed milk and the butter in a saucepan. Melt everything over low heat, until just creamy and homogeneous. Remove from heat and let cool.
Once it's cold, whisk in the cream cheese at room temperature. Cover and refrigerate for at least couple hours or overnight.
The procedure is the same for milk and white chocolate.

For the dulce de leche cream, first thing, prepare the dulce the leche: place an unopened can of sweetened condensed milk in a pot with enough water to cover the can and cook for 3 hours. Let it cool completely, then open, transfer into a glass jar and keep in the fridge.
Add the agar agar powder into the cream in a saucepan and slowly bring to a boil stirring. Remove from heat and add the butter and the dulce the leche. Stir well and then shortly mix using an immersion blender to make sure there are no lumps. Let it cool and then refrigerate.

To assemble the cake: place one cake sheet on a plate. Place a metal ring around it. Spread the milk chocolate cream over the cake, proceed with the dulce the leche cream, another cake sheet, the white chocolate cream and the last cake sheet.
Put in the fridge for at least couple hours, and then proceed with decorating.

I decorated the cake with Marshmallow fondant, so I just used a couple spoonfulls of the filling to coat the cake on top and sides. Otherwise you can decorate the cake as you like: a little of the creams used for filling, chocolate ganache, whipped cream, buttercream, whatever pleases you.


Chocolate, Almond, Dulce de Leche Cake


Torta alle mandorle, cioccolato e dulce de leche

per il biscotto (per 4 strati):
* 245 g TPT (zucchero e mandorle in proporzione 50:50)*
* 100 g uova intere
* 50 g tuorli
*  70 g farina
* 30 g cacao amaro
* 225 g albumi
* 80 g zucchero

Crema al cioccolato al latte:

* 150 g cioccolato al latte di buona qualità
* 150 g latte condensato zuccherato
* 90 g burro
* 90 g formaggio Philadelphia

Crema al cioccolato bianco:

* 150 g cioccolato bianco di buona qualità
* 150 g latte condensato zuccherato
* 90 g burro
* 90 g formaggio Philadelphia

Crema al dulce de leche:

* 175 g dulce de leche
* 250 g panna fresca con 35% di grassi.
* 4 g agar agara in polvere
* 50 g burro

* per il TPT (Fr. tant pour tant) tritate le mandorle e zucchero insieme nel mixer oppure (come ho fatto io) mescolate la farina di mandorle e lo zucchero semolato fine (tipo Zefiro) - rapporto tra mandorle e zucchero è 50:50.

** Preparate 4 fogli di carta da forno sui quali disegnate dei cerchi di diametro 22 - 24 cm e ritagliateli un po' più larghi, 3-4 cm in più.
Accendete il forno a 200°C.

Mettete in una ciotola le uova intere e i tuorli con il TPT. Montate il tutto con il mixer.
Contemporaneamente (se avete due sbattitori) montate a neve ferma gli albumi con lo zucchero. Se non avete due sbattitori elettrici, montate prima il composto di uova e mandorle e poi gli albumi che non posso aspettare molto una volta montati.
Mescolate e setacciate insieme la farina e il cacao.
Unite gli albumi montati al composto di uova e mandorle alternandoli con la farina e mescolate bene con una frusta a mano.
Dividete la massa in 4 parti uguali e cuocete 4 strati di biscotto per la torta - ho pesato la ciotola prima di iniziare e dopo quando era piena calcolando poi il peso della massa totale e dividendola in parti di peso uguale per avere 4 strati di torta di altezza uniforme.
Stendete con una spatola il composto su uno dei fogli di carta forno, preparata prima e messo su una placca da forno, riempendo il cerchio disegnato (girate il lato su cui avete disegnato sotto).
Cuocete il biscotto per 5-7 minuti nel forno ben caldo.
Trasferite il biscotto cotto sul tavolo, dopo 1 minuto staccatelo dalla carta e lasciatelo raffreddare su una griglia.
Preparate nello stesso modo gli altri tre strati (mentre uno è nel forno preparate quello successivo). La procedura è abbastanza veloce. Lasciateli raffreddare tutti, poi metteteli uno sopra altro e ritagliate i bordi in modo che siano tutti uguali.

Per le creme al cioccolato, mettete il cioccolato spezzettato, il latte condensato e il burro in un pentolino e scaldate a fuoco basso, mescolando finché tutti gli ingredienti non si siano sciolti e la crema diventi omogenea.
Trasferite la crema in una ciotola e lasciatela raffreddare a temperatura ambiente.
Una volta fredda, unite il formaggio Philadelphia a temperatura ambiente, mescolate bene con una frusta a mano e trasferite in frigo a rassodare per qualche ora.
La procedura e la stessa per il cioccolato al latte e per quello bianco.
Per convenienza, potete preparare la crema qualche ora prima di iniziare a preparare il biscotto, o anche la sera prima. Si conserva bene in frigo.

Per la crema al dulce de leche, come  prima cosa preparate il dulce de leche: mettete un baratolo di latte condensato zuccherato chiuso in una pentola e ricopritelo con l'acqua. Portate a ebollizione e lasciate cuocere per 3 ore facendo attenzione che il baratolo sia sempre immerso nel acqua. Lasciate raffreddare il baratolo completamente prima di aprirlo. Trasferite il caramello così ottenuto in un baratolo di vetro e conservatelo in frigo. Si conserva benissimo per tanto tempo, quindi preparatelo tranquillamente con largo anticipo.
Per preparare la crema, portate a ebollizione la panna mescolata con l'agar agar.
Togliete dal fuoco e aggiungete il burro e il dulce de leche, mescolate bene e poi frullate con un frullatore a immersione per ottenere una crema perfettamente liscia.
Lasciate raffreddare, prima a temperatura ambiente e poi in frigo.

Per assemblare la torta, mettete uno strato di biscotto sul piatto per la torta e mettete un anello in acciaio intorno.
Distribuite la crema al cioccolato al latte in maniera uniforme e coprite con un'altro strato di biscotto. Per distribuire la crema perfettamente, mettetela prima in un sacchetto per pasticceria (anche quelli usa e getta) e distribuite la crema in cerchi concentrici, poi lisciatela con una spatola.
Distribuite nello stesso modo la crema al dulce de leche, coprite con un altro strato di biscotto, la crema al cioccolato bianco e infine coprite con l'ultimo strato di biscotto.
Lasciate rassodare la torta in frigo per almeno 2-3 ore.
Togliete con attenzione l'anello d'acciaio e decorate la torta a piacere.

Sapendo che l'avrei decorata con la pasta di zucchero, ho conservato soltanto qualche cucchiaiata di creme usate per la torta e le ho spalmato sopra e sui lati.
Potete decorare la torta fuori con le stesse creme (lasciando da parte un po' di più di ogni crema) oppure con una ganache al cioccolato o solo panna montata e mandorle a filetti.


Chocolate, Almond, Dulce de Leche Cake


Torta s bademima, čokoladom i dulce de leche

Biskvit (za 4 kore):
* 245 g TPT (šećer i bademi u omjeru 50:50)*
* 100 g cijelih jaja
* 50 g žumanjaka
*  70 g brašna
* 30 g nezaslađenog kakaa
* 225 g bjeljanjaka
* 80 g šećera

Krema od mliječne čokolade:

* 150 g kvalitetne mliječne čokolade
* 150 g zaslađenog kondenziranog mlijeka
* 90 g maslaca
* 90 g krem sira (Philadelphia)

Krema od bijele čokolade:

* 150 g kvalitetne bijele čokolade
* 150 g zaslađenog kondenziranog mlijeka
* 90 g maslaca
* 90 g krem sira (Philadelphia)

Krema s dulce de leche:

* 175 g dulce de leche
* 250 g svježeg (mliječnog) slatkog vrhnja za šlag s 35% m.m.
* 4 g agar agara u prahu
* 50 g maslaca

*TPT (Fr. tant pour tant) je smjesa badema i šećera u omjeru 50:50 - možete bademe samljeti u mikseru zajedno sa šećerom ili posebno mljevene bademe pomiješati sa sitnim kristal šećerom ili šećerom u prahu.

Za biskvit ispecite posebno četiri kore promjera 22-24 cm. Na četiri komada papira za pečenje nacrtajte krug željenog promjera (oko 22 cm) a zatim ga izrežite za 3-4 cm šireg.
Pećnicu zagrijte na 200°C.

Stavite u zdjelu za mućenje cijela jaja, žumanjke i TPT smjesu i dobro umutite mikserom. Ako imate dva miksera onda istovremeno umutite bjeljanjke sa šećerom (u suprotnom umutite ih nakon što ste umutili smjesu od cijelih jaja i badema, jer bjeljanjci nije dobro da stoje dugo umućeni).
Pomiješajte i prosijte skupa brašno i kakao.
Dodajte naizmjenično umućene bjeljanjke i brašno u smjesu od jaja i badema od tri ili četiri puta. Miješajte ručnom pjenjačom, polako, nježnim pokretima od gore prema dolje dok ne dobijete ujednačenu smjesu.
Podijelite smjesu na 4 jednaka dijela (ja sam prije početka izvagala zdjelu, i onda opet na kraju zdjelu s cijelom smjesom tako da sam znala kolika je ukupna količina smjese koju sam podijelila na 4 dijela - kod mene 190 g za svaku koru).
Istresite 1/4 smjese za biskvit na pripremljeni krug od papira (okrenite prema dolje stranu na kojoj je nacrtan krug) koji ste položili na ravan pleh i ravnomjerno rasporedite spatulom.
Stavite peći u dobro zagrijanu pećnicu 5-7 minuta.
Ispečenu koru izvadite iz pećnice i premjestite na stol, a odmah stavite peći sljedeću (dok se jedna peče, pripremite sljedeću koru za pečenje).
Ispečenu koru nakon 1 minute okrenite prema dolje i odlijepite papir na kojem se pekla. Premjestite na rešetku da se ohladi do kraja. Ponovite postupak s preostale 3 kore i ostavite ih sve da se ohlade.
Stavite ohlađene kore jednu na drugu i malo ih obrežite ako je potrebno tako da su potpuno jednake.

Za kremu od čokolade, pomiješajte iskidanu ili nasjeckanu čokoladu, kondenzirano mlijeko i maslac narezan na komadiće i zagrijavajte na sasvim laganoj vatri miješajući neprestano dok se svi sastojci ne otope i spoje u homogenu smjesu. Maknite s vatre, prespite u zdjelu i ostavite da se potpuno ohladi na sobnoj temperaturi. Kad se krema ohladi umiješajte krem sir sobne temperature. Pokrijte i stavite u hladnjak da se dobro ohladi i stisne.
Postupak je isti za kremu od mliječne i bijele čokolade.

Za kremu s dulce de leche najprije pripremite dulce de leche tako što ćete neotvorenu limenku zaslađenog kondenziranog mlijeka staviti u lonac s vodom i kuhati 3 sata na laganoj vatri pazeći da je limenka uvijek u potpunosti uronjena u vodu. Ostavite da se potpuno ohladi pa tek onda otvorite i dobiveni dulce de leche (karamel) premjestite u staklenku. Možete ga pripremiti i danima unaprijed. Ovaj karamel može jako dugo stajati u hladnjaku.
Za kremu pomiješajte slatko vrhnje i agar agar. Zagrijavajte na laganoj vatri miješajući dok ne provrije.
Maknite s vatre i dodajte maslac i dulce de leche. Izmiješajte pjenjačom, a zatim i štapnim mikserom da dobijete glatku kremu. Ostavite je da se ohladi na sobnoj temperaturi, a  zatim u hladnjaku.

Slaganje torte:
Na tanjur položite jednu koru biskvita. Stavite oko nje metalni obruč. Po kori rasporedite kremu s mliječnom čokoladom. Da biste kremu rasporedili ravnomjernije stavite je u vrećicu za ukrašavanje (sa širokim okruglim nastavkom ili bez ikakvog nastavka, ili jednostavno u prozirnu vrećicu kojoj odrežite kut tako da imate otvor promjera 1 cm) i istisnite kremu u koncentričnim krugovima iste debljine (oko 1 cm), a zatim izravnajte i zagladite spatulom.
Preko kreme stavite drugi sloj biskvita i kremu s dulce de leche.
Zatim treći sloj biskvita, kremu s bijelom čokoladom i pokrijte sve zadnjim slojem biskvita.
Stavite tortu u hladnjak na 2-3 sata da se kreme dobro stisnu.

Ukrašavanje: budući da sam znala da ću kremu prekrivati fondantom samo sam je premazala s malo kreme izvana (odvojila sam par žlica od punjenja). U suprotnom, možete odvojiti po malo od svake kreme za ukras, ili pripremiti veću količinu jedne od tri kreme pa njome ukrasiti tortu izvana ili je premazati umućenim šlagom, ganache kremom i posuti listićima badema.


Chocolate, Almond, Dulce de Leche Cake


birthday party


birthday party


birthday party


Strawberry Marshmallow skewers


Hello Kitty - Chocolate, Almond, Dulce de Leche Cake


Hello Kitty cake topper


Brie, strawberries and balsamic vinegar tartines

$
0
0
Brie, strawberries and balsamic vinegar tartines

Mother's Day. Staying in bed until late. Surprise breakfast served in bed, prepared by kids and husband.
I must have been dreaming!!!
In fact I was, because it never happened, not in this house.
As every other morning, I was the first one to get up yesterday. Do my back streching excercises in order to be able to start the day without that pain that blocks me. And prepare breakfast for everyone... And eat mine alone, because the others were too lazy to get up.
We had a busy day ahead, too. And we spent an afternoon in beautiful company, enjoying the first barbecue this season. Great food and company, children running around, screaming, laughing and crying.
I am a happy mother of three, after all... That's my reward every day.

However, my curiosity is: How do you feel about breakfast in bed?
Never had this experience, not even in hospital, and I only went to hospital three times in my whole life, to give birth to my kids.
Well, my husband, the most "romantic" soul on Earth, says he can't understand why would someone wish to have his breakfast served in bed, it would make him feel ill.
On the contrary, I think it would a beautiful gesture, a little attention that every woman, or at least most women, dream to receive every now and then. Don't you agree?

I don't think it's gonna happen soon. But never mind. I do offer myself a lazy treat every now and then.
Like these tartines.
It's not really a recipe, but rather an idea. They can be assembled in no time. They look beautiful and elegant enough to serve as an appetizer in any occasion. But wouldn't be bad for breakfast either.
I had some rye bread that I used here, but any similar, whole grain bread would do perfectly as well.
Besides, Brie cheese could be substituted with other types, like fresh goat cheese for example.
Grab a bite...

Brie, strawberries and balsamic vinegar tartines


Brie, strawberries and balsamic vinegar tartines

* rye or other whole grain bread, sliced thinly
* Brie cheese, sliced (or fresh goat cheese)
* fresh strawberries
* traditional balsamic vinegar 

Cut the bread into size and shape that you prefer: squares, rectangles, circles.
Cut the cheese to fit the size and shape of bread and place on top of bread.
Wash, hull, and dry the strawberries. Slice them and place on top of cheese.
Complete with a few drops of thick, traditional balsamic vinegar just before serving.
You may also add a little freshly ground pepper on top.


Brie, strawberries and balsamic vinegar tartines


Tartine con Brie, fragole e aceto balsamico

* fettine di pane alla segale (o altri tipi di pane integrale)
* formaggio Brie (oppure caprino fresco)
* fragole
* aceto balsamico tradizionale

Tagliate le fettine sottili di pane in forma desiderata e più adatta al occasione: quadretti, rettangoli, cerchietti.
Ritagliate il formaggio nello stesso modo e mettete una fettina su ogni pezzetto di pane.
Lavate e asciugate le fragole. Tagliatele a fettine abbastanza spesse e mettetele sopra il formaggio.
Completate con qualche goccia di aceto balsamico, quello tradizionale, denso, un momento prima di servire le tartine.
A piacere aggiungete anche un po' di pepe macinato al momento.


Brie, strawberries and balsamic vinegar tartines

Vrti mi se po glavi gomila recepata s kruhom. Pitate se zašto. Osim što kruh volim i peći i jesti, u ovomjesečnom krugu igrice Ajme koliko nas je, igramo se s kruhom po želji domaćice, Nevene s bloga Hleb i lale.
Kao po narudžbi kamo god se okrenem vidim neki recept u kojem je kruh protagonist. Ali oni će tek doći na red.
Za početak, brzinska, trenutna inspiracija za jedan lijeni ručak, ili bolje rečeno predjelo, pripremila sam sebi ove tartine sa sirom i jagodama, u kojima je jedan od protagonista bio i raženi kruh. Pauzica dok sam pripremala pekmez od jagoda, ali svakako je zgodna ideja za hladno predjelo, ukusno i elegantno u svakoj prilici.

Tartine s Briejem, jagodama i balsamicom

* tanke kriške raženog ili drugog integralnog kruha
* sir Brie ili svježi (mazivi) kozji sir
* svježe jagode
* tradicionalni (gusti) balzamični ocat

Izrežite kriške kruha na željeni oblik: kvadratiće, pravokutnike, krugove...
Izrežite kriške sira na isti oblik i stavite preko kruha (ako koristite svježi sir samo ga namažite po kruhu)
Oprane i posušene jagode izrežite na deblje kriške i složite preko sira.
Neposredno prije posluživanja, preko jagoda stavite par kapi balzamičnog octa.
Po želji dodajte preko svega malo svježe mljevenog papra.


Summer Style Pasta e Fagioli

$
0
0
Summer Pasta and Fagioli

Spring, summer, they both seem to be so far, unreachable... after all this rain, I'm thinking summer this year might have gone on a looooooooong vacation, somewhere else. No, no, no, I'm not complaining... at least not too much, because then it might hit again like last year and that wouldn't be nice either.
Summer is not only the hot weather, summer for me is, first of all, variety of colourful food on the table. Salads, light pasta dishes, quick and easy meat or fish dishes. And always, lots of veggies.
Therefore, a classical dish from Italian cousine, Pasta e fagioli, must lighten up as well.

Summer Pasta and Fagioli

Otherwise, just thinking of a heavy soup would put you off. Instead, this version (vegetarian) is perfect for summer as well.
I particularly like preparing it during late spring and throughout summer when fresh borlotti beans are available. They are more tender, and need less time to be cooked, don't need to be soaked overnight. And also because I can't resist the beautiful colour of their pods. And the beans as well, although they loose their colour when cooked.
So forget about pancetta, but enjoy every spoonful of this delicious soup.
You could also cut one step, that is to say, add the tomatoes directly to the pot with the beans and vegetables, but trust me, roasted tomatoes add much more flavour, so I never skip that part.
To be honest, I prepare Pasta e fagioli this way all year round, because once the fresh beans are not available any more, stores carry the frozen ones that are equally good. And sometimes I sub the beans with the chickpeas.
You might add some other summer veggies, too, like bell peppers, and to get most of the flavour, roast them in the oven first, just like the tomatoes, cut into smaller pieces, with herbs and olive oil.


                                  Fresh Borlotti Beans Fresh Borlotti Beans


Summer Pasta and Fagioli (Pasta with beans)

* 300 g fresh borlotti beans (or frozen)
* 1 potato
* 1 onion
* 1 carrot
* 1 stalk of cellery
* 1 clove of garlic
* 1 bay leaf
* extra virgin olive oil
* 150 g small size pasta (e.g. ditalini)
* about 15 cherry tomatoes

Remove the beans from the pods (if using frozen ones, no need to thaw them) and put them in a pot. Add the chopped potato, carrot, cellery and onion, as well as garlic clove and bay leaf. Add about 1,5 liters water and bring to a boil. Lower the heat to meadium and cook covered for about 1 hour or until the beans are tender. Add salt and pepper to your taste, but only towards the end.
In the meantime, cut the tomatoes in half and put them on a baking tin, cut side up. Salt and sprinkle with herbs (thyme, basil, herbs of Provance, or whatever you prefer), drizzle with olive oil and roast them in the oven preheated to 200°C for about 20 minutes.
Take them out of the oven, and when they've cooled a little peel the skin and chop them. Add the tomatoes to the soup.
When the beans are cooked, remove the bay leaf, and pass about half  of the beans and vegetables through a food mill (no blender or food processor).  Put them back to the pot with the whole beans.
Add the pasta you cooked al dente in another pot, cook everything together shortly and it's ready to be served. This dish can be served hot, warm or cold. It can be prepared ahead and refrigerated, but add the pasta only when ready to serve.
Add a drizzle of olive oil to each plate.


Summer Pasta and Fagioli


Pasta e fagioli estiva


* 300 g fagioli borlotti freschi o surgelati
* 1 patata
* 1 cipolla
* 1 carota
* 1 gambo di sedano
* 1 spicchio d'aglio
* 1 foglia di alloro
* olio extra vergine d'oliva
* 150 g pasta corta (per esempio ditalini)
* circa 15 pomodorini 

Sgranate i fagioli e metteteli in una pentola, aggiungendo la carota, la patata, la cipolla e il sedano tagliati grossolanamente, l'aglio e l'alloro. Versate nella pentola circa 1,5 l di acqua e 2 cucchiai di olio EVO.
Portate a bollore, e continuate a cuocere coperto a fuoco medio per circa un'ora. Salate e pepate verso fine cottura.
Nel frattempo tagliate i pomodorini a metà e sistemateli su una placca da forno con il lato tagliato verso l'alto. Salateli e cospargete con delle erbe fresche o secche (timo, basilico, erbe di Provenza...), irrorate con un po' di olio e infornate per 20 minuti a 200°C. Toglietele dal forno, aspettate che si raffreddino un po' e poi pelatele e tagliate a pezzettini. 
Aggiungete i pomodori alla zuppa. 
Quando i fagioli sono cotti, prelevatene circa metà (insieme alle verdure), togliendo prima l'alloro, e passateli al passaverdure. Rimettete i fagioli passati nella pentola, aggiungete la pasta cotta a parte, lasciate insaporire tutto per un paio di minuti.
Potete servirla calda, tiepida o anche fredda. La zuppa da sola (senza pasta) può essere conservata in frigorifero.
Nel momento di servirla, aggiungere un filo d'olio direttamente nel piatto.


Summer Pasta and Fagioli


Ljetna pasta fažol

* 300 g svježeg mladog graha (može i smrznuti)
* 1 krumpir
* 1 glavica crvenog luka
* 1 mrkva
* 1 stapka celera
* 1 češanj češnjaka
* 1 list lovora
* maslinovo ulje
* 150 g kratke tjestenine (npr. ditalini)
* 15-ak zrelih cherry rajčica

Očistite grah i stavite ga u lonac. Dodajte očišćene i krupno narezane luk, krumpir, mrkvu i celer, češnjak i lovor. Prelijte sve s oko 1, 5 l vode, dodajte 2 žlice maslinovog ulja.
Stavite kuhati, kad provrije, smanjite vatru na srednje jaku i kuhajte oko 1 sat, dok grah nije kuhan, povremeno miješajući. Pred kraj posolite i popaprite po ukusu. Ako ispari previše vode ili volite da je rjeđe, dodajte u kuhanju još vode.
U međuvremenu prerežite rajčice na pola (odstranite dio sjemenki), stavite ih na pleh obložen papirom za pečenje, pospite s malo maslinovog ulja i začinskim biljem po želji (mješavina provansalskog bilja, ili timijan, bosiljak i dr.). Stavite peći rajčice na 200°C oko 20-ak minuta. Pečenim rajčicama odstranite kožu i narežite ih sitno nožem ili ih kratko smrvite štapnim mikserom.
Kad je grah kuhan, izvadite otprilike polovicu, a ostatak propasirajte (odstranite lovor). Pomiješajte opet sve, dodajte rajčice i skuhanu tjesteninu. Kratko sve zajedno prokuhajte. Poslužite toplo, mlako ili hladno, i po želji dodajte još malo maslinovog ulja izravno u tanjur.

Grah možete pripremiti i dan ranije, samo nemojte odmah dodati tjesteninu.

Summer Pasta and Fagioli

Rye flour pancakes with ricotta and fresh fruit

$
0
0


Rye flour pancakes with ricotta and strawberries

I often hear people say they don't have breakfast either because they don't have time or because they can't force themselves to eat anything early in the morning.
For me neither time nor lack of appetite in the morning are a question. Five minutes can be sufficient to sit down, but if I have half an hour, I'll enjoy it from the first to the last minute, too. In fact, it is rather common thing to see me sitting at the kitchen table with my coffee and breakfast, on lazy weekend mornings, enjoying my breakfast slowly, starting much before my husband enters, swallows his latte macchiato and a couple cookies, and still sitting there long after he's moved on. I just love those moments. I enjoy breakfast more than other meals.
Lack of appetite? I don't even know what that is!!! Even if I get up at 5 am I can't do anything until I've had my breakfast first.

Rye flour pancakes with ricotta and cherries

Now, what to eat for breakfast is such a diverse concept from country to country.
And it is probably the meal that has undergone major change since I moved to Italy.
My mother always prepared us savory breakfasts. Meat in some form was often a guest at our breakfast table. And it's actually the part I never really enjoyed. I always prefered all sorts of other things, from eggs, patès, vegetables, and God knows what else that used to sit on our breakfast table. And we used to have breakfast all together like at all other meals.
In Italy, the concept of breakfast as such, I've seen only in the TV commercials. At least it's how it works in my family. Everybody gets up at different moments, and have breakfast when and how they like, if having any. Nobody prepares really breakfast.  A pot of coffee and whatever you grab on the go, a cookie, a slice of bread, or a cake, or a crostata, cereals, a brioche or croissant.  Notice the difference? Only sweet stuff. Well that's Mediterranean breakfast style, as opposed to Continental one, as they call it here.
And it's also how things you eat are perceived. I remember when I just moved here, and prepared French toast once. Everybody was looking at me as if I were an alien. You eat such heavy, caloric stuff?!? Yea, and I enjoy them, too. But, is your croissant filled with pastry cream or Nutella really so much lighter than my French toast? And healthier?  I don't know...
But, fine, let's forget about philosofic matters and let's just grab something that I'm sure none of you would refuse neither at breakfast nor as a dessert at the end of a meal. Actually, I might have this for lunch as well...
It's good, it's healthy, it's light. Everyone satisfied?
Just grab your fork and be my guests. Strawberry season is almost over, but there's lots more juicy fruit coming in.

Rye flour pancakes with ricotta and strawberries

Rye flour pancakes with ricotta and fresh fruit
(from Cucina naturale magazine)

for pancakes:
* 2 eggs
* 2 TBspoons sugar
* 50 g wheat flour
* 75 g rye flour
* 250 ml milk
* 1 teaspoon ground cinnamon
* a little salt

filling:
* 250 g ricotta cheese
* 1/2 lemon (organic)
* 3 TBspoons powdered sugar
* 250 g fresh fruit (strawberries, cherries, peaches, etc.)

Put the eggs in a mixing bowl, add a little salt and whisk a little bit. Add both flours sifted together, and then sugar and cinnamon. Add the milk pouring it slowly while whisking to get smooth batter.
Let the batter rest for 1 hour.
Warm up a skillet that you lightly oiled first.
Stir the batter well and then pour a little at a time into a warm skillet forming 10 cm round pancakes. Cook them until golden underneath, flip and cook on the other side, too. Move them on a plate once they're done.
For the filling, wash the lemon and grate the zest first and sqeeze the juice next.
Wash, dry and cut the fruit into small pieces.
Whisk the ricotta cheese with sugar, lemon zest and juice until creamy. Mix in the chopped fruit.
Assemble little pancake cakes with three pancakes and ricotta fruit filling in between. Decorate with more fresh fruit or chocolate sauce ot whatever you like.


Rye flour pancakes with ricotta and strawberries

Pancakes con farina di segale alla frutta e ricotta
(da Cucina naturale)

per i pancake:
* 2 uova
* 2 cucchiai di zucchero
* 50 g di farina di grano
* 75 g di farina di segale
* 250 ml di latte
* 1 cucchiaino di cannella in polvere
* un po' di sale

per il ripieno:
* 250 g di ricotta
* 1/2 limone non trattato
* 3 cucchiai di zucchero in polvere
* 250 g di frutta fresca (fragole, ciliegie, pesche, ecc.)

Mescolate le uova con il sale in una ciotola sbattendole leggermente con una frusta a mano. Aggiungete le due farine precedentemente mescolate e setacciate, e poi lo zuccher, la cannella e alla fine versateci piano il latte mescolando poi con la frusta per ottenere una pastella liscia senza grumi.
Lasciate riposare la pastella per 1 ora.
Scaldate una padella leggermente oleata.
Versateci un po' di impasto nella padella calda formando dei piccoli pancakes da 10 cm di diametro. Quando sono dorate sotto, giratele e cuocetele anche dal altro lato.Una volta cotte, trasferitele su un piatto.
Per il ripieno, lavate e asciugate il limone. Grattugiatene la scorza e poi spremete il succo.
Lavate e asciugate la frutta e poi tagliatela a pezzettini.
Mescolate bene la ricotta con lo zucchero, la scorza e succo di limone, fino a ottenere una crema.. Unite la frutta tagliata..
Formate piccole torrette con tre pancakes e aggiungete il ripieno tra due strati.
Decorate con la frutta fresca e a piacere servite con la salsa al cioccolato.


Rye flour pancakes with ricotta and cherries

Ražene palačinke s ricottom i voćem
(iz časopisa Cucina naturale)

za palačinke:
* 2jaja
* 2 žlice šećera
* 50 g pšeničnog brašna (bijelog)
* 75 g raženog brašna
* 250 ml mlijeka
* 1 žličica cimeta
* malo soli
* ulje za pečenje

punjenje:
* 250 g sira ricotte
* 1/2limuna
* 3 žlice šećera u prahu
* 250 g voća (jagoda, trešanja, bresaka, itd.)

Razmutite jaja s malo soli, u zdjeli pjenjačom, dodajte oba brašna prosijana skupa, a zatim šećer, cimet i polako dodajite mlijeko da se ne stvore grudice.
Ostavite tijesto da odmori 1 sat.
Zagrijte malo nauljenu tavu.
Promiješajte tijesto pa stavljajte žlicom ili manjom grabilicom na vruću tavu tako da dobijete deblje palačinkice promjera oko 10 cm. Okrenite ih i zapecite i s druge strane, a zatim vadite na tanjur.
Za nadjev, operite i posušite (neprskani) limun. Naribajte koricu 1/2 limuna i iscijedite sok.
Voće operite, posušite i narežite na kockice.
Pomiješajte dobro ricottu sa šećerom, koricom i sokom limuna da postane kremasta. Umiješajte nasjeckano voće.
Napravite tortice od 3 palačinkice - na svaku stavite dio pripremljene kreme od ricotte i voća.
Ukrasite komadićima voća.


Rye flour pancakes with ricotta and strawberries

Melon Sorbet

$
0
0
Melon Sorbet

All media have been talking about the Royal baby.
Everyone seems anoyed by the fact.
But to be honest, I would prefer to live in the world where TV and newpapers had no bad new like this to talk about. Would it be so bad? To have have only lucky children born to this world and not having to feel sorry for less fortunate ones?

We all have our little Royal babies. Mine is almost 1 year old and I can't believe he's already that big. He's all over the place and that's certainly one of the reasons why I haven't been posting anything lately. Time factor isn't really playing in my favor but that's ok. These precious moments are something you live only once (to tell the truth I've been living them for the third time ^_^)  and I'm not sorry I'm part of them.

I was thinking about the recipe to post after this long hiathus, and although the recipe for semolina flour bread was already half written, and many others at least had pictures and title in them, I thought the moment of major summer heat called for something fresh and simple to make, without turning your oven on or fussing much around.
Following an article in Cucina naturale magazine, I prepared four different flavors sorbets, and I loved them all, but my family voted this one as absolutely THE best.
So, I'm happy to share it with you.
Have a great weekend.... see you next week, maybe  ^_^

Melon Sorbet

Melon sorbet

* 500 g melon pulp
* 240 g maple syrup (or simple sugar syrup)
* 290 ml cold water
* 5 g locust bean gum/powder
* juice from 1/2 lemon
* a pinch of turmeric spice and  powdered corriander seeds (optional)

Mix the maple syrup with cold water and the locust bean gum in a blender or using a stick blender.
Add the melon pulp cut into cubes and the spice if desired. Mix until you get a smooth creamy mixture.
Shortly before pouring it into an ice cream maker, stir in the lemon juice.
Pour half of the mixture into an ice cream maker and freeze for 15-20 minutes.
Serve the sorbet immediately if you like it soft or transfer into a freezer safe container and chill for about an hour before serving it.
Proceed with the second half of the sorbet mixture or keep it in the fridge for up to 3 days if you want to prepare it later.

* about Locust bean powder. To order it check here for example.
* As an alternative to maple syrup, prepare a simple syrup boiling 350 ml water with 650 g raw cane sugar. Cook the syrup on low heat until it reaches 85°C. Let it cool to room temperature then pour into a glass container and refrigerate for up to 1 week.
* If you don't have an ice cream maker, freeze the sorbet mixture in an ice cubes mould. Once it's completely frozen, process it shortly in a food processor or a blender and serve immediately.

Melon Sorbet

Sorbetto al melone

* 500 g polpa di melone pulita
* 240 g sciroppo d'acero (o sciroppo di zucchero)
* 290 ml acqua fredda
* 5 g farina di semi di carruba
* succo di 1/2 limone
* un pizzico di curcuma e coriandolo in polvere (optional)

Mescolate lo sciroppo d'acero con l'acqua fredda e la farina di semi di carruba. Mescolate per qualche istante con un frullatore a immersione per evitare i grumi.
Aggiungete la polpa di melone tagliata a dadini. A piacere aggiungete anche un pizzico di curcuma e coriandolo in polvere. Mescolate ancora bene con il frullatore per ottenere una crema liscia.
Poco prima di versare la crema nella gelatiera, aggiungete il succo di limone.
Versate metà della crema nella gelatiera e lasciatela lavorare per 15-20 minuti circa.
Potete servirlo subito se vi piace il sorbetto morbido, oppure trasferire nel freezer se vi piace più sodo.
Proseguite con la preparazione dell'altra metà della crema, oppure conservatela nel frigo fino a 3 giorni e preparate il resto del sorbetto poco prima di consumarlo.

* La farina di semi di carruba e una polvere bianca/giallastra. Si usa nella preparazione di gelati, caramelle, prodotti per pasticceria. Si usa come addensante, emulsionante, stabilizzatore. Si può trovare on line oppure nei negozi NaturaSì
* Per preparare lo sciroppo di zucchero, riscaldate 350 ml di acqua con 650 g di zucchero integrale di canna mescolando finché non si sia sciolto e lo sciroppo raggiunge la temperatura di 85°C. Lasciatelo raffreddare a temperatura ambiente e poi conservatelo in frigo fino al momento di usarlo. Si conserva per una settimana.
* Se non avete la gelatiera, versate la crema nei stampi per il giaccio. Una volta che si sia congelata, frullate i cubetti e servite il sorbetto subito.


Melon Sorbet

Sorbet od dinje

* 500 g očišćene dinje
* 240 g javorovog sirupa (ili šećernog sirupa)
* 290 ml hladne vode
* 5 g brašna od sjemenki rogača
* sok 1/2 limuna
* prstohvat kurkume i korijandera u prahu (po želji)

Pomiješajte javorov sirup s hladnom vodom i brašnom sjemenki rogača. Izmiksajte štapnim mikserom ili u blenderu da razbijete eventualne grumenčiće.
Dodajte voće narezano na kockice (po želji dodajte prstohvat kurkume i korijandera u prahu). Opet izmiksajte dok ne dobijete glatku kremu.
Prije nego ćete sipati kremu u aparat za sladoled dodajte sok limuna i izmiješajte.
Sipajte polovicu kreme u aparat za sladoled i uključite ga. Neka radi 15-20 minuta.
Sorbet možete poslužiti odmah, ili ako želite da je čvršći premjestite ga u posudu s poklopcem i rashladite dalje u zamrzivaču.
Drugu polovicu možete pripremiti odmah, ili čuvati u hladnjaku do 3 dana i pripremiti ga kad vam je potreban.


* sorbet je najbolji tek pripremljen, ima jako sitne kristaliće leda i mekan je. Stajanjem u zamrzivaču će dosta očvrsnuti stoga ga ili ostavite par minuta na sobnoj temperaturi ili izrežite na kocke pa promiksajte vrlo kratko u blenderu prije posluživanja
* ako nemate stroj za sladoled, uspite kremu za sorbet u kalupiće za led. Kad se zalede, stavite ih u blender i kratko izmiksajte i poslužite odmah.
* brašno od sjemenki rogača nije mljeveni rogač (i ne može se zamijeniti njime), radi se o bijelom-bež prahu koji se koristi u izradi sladoleda, karamela, slastičarskih proizvoda. Koristi se za zgušnjavanje, emulzioniranje, želiranje ili kao stabilizator.
Nisam sigurna može li se i čime zamijeniti brašno od sjemenki rogača ovako na hladno tj. bez kuhanja, a da bi se postigla ista funkcija tj. kremasta konzistencija s manje kristala leda. Rečeno mi je da se xantham gum može koristiti kao alternativa, ali ja nisam s njom isprobala.
U krajnjem slučaju isprobajte bez ikakvog dodatka, razlika će se osjetiti samo u konzistenciji i kristalima leda. U Italiji se može kupiti on line ili u trgovinama Naturasì.
* umjesto javorovog sirupa možete pripremiti šećerni sirup tako što ćete zagrijavati 350 ml vode sa 650 g nerafiranog smeđeg šećera dok se sav šećer ne istopi i tekućina dostigne temperaturu od 85°C. Ostavite sirup da se potpuno ohladi na sobnoj temperaturi, a zatim ga ulijte u staklenu bocu i čuvajte u hladnjaku do upotrebe. Rok trajanja mu je tjedan dana. Od ove količine sirupa možete pripremiti oko 3 kg sorbeta, stoga, ako vam je to previše, pripremite manju količinu. Ali ako namjeravate često praviti sorbete zgodno je imati ga pri ruci već pripremljenog.

Melon Sorbet


Peach and Amaretti Lattice Pie... HB to me!!!

$
0
0

Peach and Amaretti PIe

What's the beauty of turning 41? If you look at the glass half full it's everything that surrounds me. Me myself (Hey, I'm still here, life is beautiful!!!)... my three kids and husband (just one look at all of them fills my heart with joy and happiness, peace and... oh, well, they're not always angels, but they are mine, and I love them as they are)... little everyday things that make part of my life, little aches and sorrows, losses and gains.
Life's making slow and steady progress and I sincerely hope to be sitting here at 82, with a couple grandchildren in my lap to tell you about the beauty of still being here :)))
Yes, I turned 41 yesterday. Jeez, the number scares me a little bit, I admit. That's when think about the glass half empty. Sometimes I wish my kids wouldn't repeat it for days, I'd rather just sleep for two days and wake up not thinking about it at all. And when one of your friends turns 27 (27!!?) and the kids shout, "Wow, she's so young and you're already 40!? Life is good, no matter what...

Peaches

And here we go. Usually we're away from the beginning of August and I never get to make a birthday cake for myself. This year we are still in town, Torturing ourselves, because the heat is so unbearable that even with the AC on I'm breathing rather like a fish out of water. Just few more days and this fish will be swimming in the crystal clear sea waters, but until then... I even had to give up an idea of baking myself a cake.
But luckily, I have something  I managed to bake last week to offer.
And it was so good that you won't be sorry if you decide to make it. The idea came from a food magazine, I just thought that if I replaced the puff pastry from the original recipe with a nice, flaky pie crust, the hole thing would take a step forward to a new level.
And it did. I enjoyed every little bite of it. My diet and my perfect bikini look got closed in a drawer. Hell, that's the beauty of being 41, you don't have to prove anything to anyone. You get to enyoy lots of sweet little things in life, you can always start dieting tomorrow. I still look good to myself and I'm happy.
Have a good day folks. If I don't get too busy preparing vacation bags, I'll get back to you with a new recipe before I leave, or at least leave you with something to read while I'm away.

Peach and Amaretti PIe


Peach and Amaretti Lattice Pie

Pie crust:
* 200 g flour
* 1 TB spoon brown sugar
* 110 g cold butter
* 6-7 TB spoons ice cold water
Filling:
* 60 g amaretti cookies - approx. 18-20 pc.
* 2 big peaches (ripe but firm)
* 2 TBspoons sugar
* 1 egg
* 40 g powdered sugar
* 50 g almond meal
* 20 g rum

Prepare the pie crust:
Put the flour and the sugar in a food processor and mix shortly (pulse a few times).
Add cold butter cut into cubes and pulse again several times to get just coarse crumbs.
Add 2 TB spoons of very cold water at a time and pulse in between.
To get a good, flaky pie crust it is important not to overmix and heat butter, so it melts. If in the end you can see flakes of butter throughout the dough that's perfectly fine.
Drop the dough on a piece of plastic wrap, just bring everything into a ball without kneading it. Wrap and refrigerate for at least 2 hours (or up to 2 or 3 days).

Prepare the filling:
Peel the peaches and cut them into 1 - 1,5 cm thick wedges.
Combine the caster sugar with 1 TB spoon of water in a skillet and heat stirring until the sugar's melted. Add the peaches and cook them in the syrup just enough to make them a little soft zatim. Remove from heat and let them cool.
Beat the egg with the powdered sugar until creamy.
Stir in the almond meal and in the end the rum.

Take 2/3 of the dough and roll it thin into a rectangle.  Press it into a 35x10 pie/crostata mould.
Put the amaretti cookies on the bottom.
Pour the almond batter over the cookies.
Arrange the peach wedges over the batter.

        Peach and Amaretti PIe    Peach and Amaretti PIe    Peach and Amaretti PIe

Roll out the remaining 1/3 of the dough and cut a lattice with the approprite lattice cutter or a simple knife following the pattern in the picture (otherwise just cut into strips and make a woven lattice top). It's easier to work with the chilled dough, so if it has softened, refrigerate it again after you've rolled it out.
Transfer the lattice top and cover the filling.

                                 Peach and Amaretti PIe     Peach and Amaretti PIe

Brush the top lattice with a little milk or egg wash or (like I did) with the syrup you cooked peaches in and sprinkle with some brown sugar.l
Bake the pie in the oven preheated to 180°C for about 40 minutes.

Peach and Amaretti PIe

Pie alle pesche e amaretti

Pasta:
* 200 g di farina 00
* 1 cucchiaio di zucchero di canna
* 110 g di burro freddo
* 6-7 cucchiai di acqua molto fredda
Ripieno:
* 60 g di amarett - circa 18-20 biscotti.
* 2 pesche grandi (mature, ma sode)
* 2 cucchiai di zucchero semolato
* 1 egg
* 40 g di zucchero a velo
* 50 g di farina di mandorle
* 20 g di rum


Preparate la pasta:
Mettete la farina e lo zucchero nel robot da cucina e pulsate un paio di volte.
Aggiungete il burro freddo tagliato a cubetti e pulsate di nuovo per qualche secondo senza esaggerare, dovete ottenere delle briciole piuttosto irregolari e grossolane.
Aggiungete l'acqua molto fredda, 2 cucchiai alla volta pulsando qualche volta dopo ogni aggiunta.
La cosa importante per ottenere un buon impasto è non mescolare troppo per non permettere al burro di ammorbidirsi troppo. Se alla fine i pezzetti di burro sono ancora visibili nel impasto, tanto meglio.
Rovesciate l'impasto su un pezzo di pellicola alimentare e raccoglietelo formando una palla senza impastare, però. Avvolgete la pasta e riposatela in frigo per almeno due ore (o fino a 2-3 giorni).

Preparate il ripieno:
Sbucciate le pesche e tagliatele a fette spesse 1 - 1,5 cm.
Mettete lo zucchero semolato con 1 cucchiaio d'acqua in una padella e scaldatelo finché non si sia sciolto. Aggiungete le pesche e fatele cuocere nello sciroppo fino ad ammorbidirle un po'. Toglietele dal fuoco e lasciatele raffreddare nello sciroppo.
Sbattete bene l'uovo con lo zucchero a velo.
Aggiungete la farina di mandorle e rum.

Prendete  2/3 di pasta e stendetela sottile con un mattarello formando un rettangolo. Rivestite con la pasta stesa uno stampo rettangolare per crostate (35x10 cm).
Distribuite gli amaretti interi sul fondo.
Versate la crema alle mandorle sopra i biscotti e distribuitela uniformemente.
Arrangiate le pesche sopra la crema.
Stendete la pasta rimanente e incidetela con il rullo per losanghe oppure tagliatelo a strisce e formate una griglia sopra il ripieno.
Trasferite la griglia nello stampo coprendo  bene il ripieno.
Spennellate la griglia con un po' di latte o un uovo sbattuto con un po' di latte o (come ho fatto io) con lo sciroppo delle pesche.
Infornate la pie a 180°C per circa 40 minuti.

Peach and Amaretti PIe


Pita s breskvama i amarettima

Tijesto:
* 200 g brašna
* 1 žlica smeđeg šećera
* 110 g hladnog maslaca
* 6-7 žlica ledeno hladne vode
Nadjev:
* 60 g amaretta (keksića) - oko 18-20 kom.
* 2 breskve
* 2 žlice kristal šećera
* 1 jaje
* 40 g šećera u prahu
* 50 g mljevenih badema
* 20 g ruma

Priprema tijesta:
Stavite brašno i šećer u multipraktik i kratko izmiksajte.
Dodajte hladan maslac narezan na kockice i opet vrlo kratko izmiksajte (par sekundi).
Dodajte 2 po dvije žlice jako hladne vode (iz hladnjaka) i svaki put kratko izmiksajte.
Ne miksajte dugo da se maslac ne zagrije i ne otopi. Ako se i vide komadići maslaca u tijestu, u redu je.
Istresite tijesto na komad prozirne folije i prikupite sve u lopticu, ne mijesite, omotajte i stavite u hladnjak na par i sati (može stajati i dva, tri dana).

Priprema nadjeva:
Breskve ogulite i narežite na ne kriške debljine oko 1 - 1,5 cm.
Stavite u tavu kristal šećer s 1 žlicom vode i zagrijavajte da se šećer otopi. Dodajte zatim breskve i pažljivo miješajući kuhajte ih u sirupu tek toliko da malo odmeknu, ne da se raspadnu. Maknite s vatre i ostavite da se ohlade.
Umutite jaje sa šećerom u prahu.
Dodajte mljevene bademe i na kraju rum.
Odvojite 2/3 tijesta i razvaljajte ga tanko pa utisnite u niski kalup za crostate/pite. Moj kalup je 35x10 cm.
Preko tijesta rasporedite cijele amarette.
Prelijte smjesu s bademima preko amaretta.
Preko kreme rasporedite breskve.
Preostalu trećinu tijesta razvaljajte i narežite rešetku (odgovarajućom spravicom ili nožem) ili ako vam je lakše izrežite na uske trakice pa ih složite u rešetku.
Lagano raširite rešetku i prekrijte nadjev.
Uz pomoć kista premažite tijesto s malo mlijeka, jajetom razmućenim s malo mlijeka ili (kao ja) sirupom u kojem su se kuhale breskve, i pospite kristal šećerom.
Stavite peći pitu u pećnicu zagrijanu na 180°C oko 40 minuta.

Peach and Amaretti Pie


Peach and Amaretti PIe

Follow my blog with Bloglovin

Vegetable Crumble

$
0
0

Vegetable Crumble

You probably don't expect a food blogger to ever run out of ideas for a meal. But the truth is, it happens often, more often than I like to admit. Mostly because I'm totally disorganized when it comes to meal planning. My husband often critisizes me for this reason, saying we'd also save money not only time if I decided to make a weekly meals plan. But it's just not me. I mean planning in general. I feel like it kills the creativity.
I like shopping for fresh fruit and vegetables and it is then that I decide what I want to make with those lovely little summer zucchini, or cherry tomatoes, or peaches or whatever is in season and whatever looks fresh and good.
The other side of the medal is that sometimes I buy too much and either forget there are things burried at the bottom of vegetable box or for whatever other reason (lazyness, heat...) I don't get to cook them in time, that is before they turn bad.
And there are times, again, when I'd like to make something with zucchini, and there's only one left. I'd like to prepare some asparagus, but there's only a few left. Or that head of broccoli that's almost turned yellow, but there's still a few florets that can be saved. Well for those odd times I've found a delicious solution. A mixed vegetable crumble.
You can simply mix anything you like, and toss in the oven with some nice, golden cheesy topping. In a matter of minutes, with less effort than you can imagine, a delicious meal or side dish is served.
You can prepare one big dish to divide later, or divide into single serving baking dishes before baking it. Choose the veggies you like, don't feel forced to use something you don't like.

 Vegetable crumble

* about 1/2 kg (1lb) mixed fresh vegetables (broccoli, asparagus, zucchini, shallots, cherry tomatoes, cauliflower- depending on season or whatever you have or like)
* fresh marjoram leaves
* extra virgin olive oil
for crumbs:
* 50 g flour
* 30 g grated pecorino or parmigiano cheese
* 35 g cold butter

Wash and clean the vegetables. Cut them into larger chunks. Cut the cherry tomatoes in half and remove the seeds with a finger.
Warm up a little olive oil in a skillet and add the shallots first, then everything else. Sauté the vegetables on medium heat for 5-10 minutes. Season with salt and pepper to taste.
Lightly oil a baking dish and put the vegetables in.

               Vegetable CrumbleVegetable Crumble

Sprinkle some fresh marjoram leaves over the vegetables.
For the crumbs, mix the flour with the grated cheese. Rub in the cold butter to form crumbs. Sprinkle them over the vegetables.
Bake in an oven preheated to 180°C for about 30 minutes or until the crumbs are golden brown.


Vegetable Crumble


Crumble di verdure

* circa 1/2 kg di verdure (broccoli, asparagi, zucchine, cipollotti, pomodorini, cavolfiore - quello che avete o più vi piace)
* maggiorana fresca
* olio extra vergine d'oliva
per il crumble (briciole):
* 50 g farina
* 30 g pecorino o parmigiano gratuggiato
* 35 g burro freddo

Lavate e pulite le verdure. Tagliatele in pezzi non troppo piccoli. Tagliate i pomodorini a metà e togliete i semi con un dito.
Scaldate un po' di olio in una padella, aggiungete prima i cipollotti e poi tutte le altre verdure e saltatele a fuoco medio per 5-10 minuti. Conditele con sale e pepe.
Ungete leggermente una pirofila da forno con un po' di olio e trasferitevi le verdure saltate.
Distribuite le foglioline di maggiorana sopra le verdure.
Per le briciole, mescolate prima la farina con il formaggio grattugiato. Aggiungete il burro freddo a tocchetti e strofinate con le mani per ottenere delle briciole irregolari. Cospargetele sopra le verdure.
Mettete i crumble a cuocere nel forno già caldo a 180°C per circa 30 minuti o finché le briciole non sono dorate.


Vegetable Crumble


Povrtni crumble

* oko 1/2 kg različitog svježeg povrća (brokula, šparoge, tikvice, mladi luk, cherry rajčice, karfiol - što imate i volite)
* svježi mažuran
* maslinovo ulje
za mrvice:
* 50 g brašna
* 30 g naribanog pecorina ili parmigiano
* 35 g hladnog maslaca

Povrće operite i narežite na krupnije komade. Rajčice samo prepolovite i prstom odstranite sjemenke.
Zagrijte u tavi malo ulja pa dodajte povrće - prvo mladi luk, pa zatim i ostalo. Pirjajte miješajući na srednje jakoj vatri 5-10 minuta.
Posolite i popaprite po ukusu
Malo nauljite vatrostalnu posudu i rasporedite povrće u ravnomjernom sloju (ili rasporedite u individualne posudice).
Pospite listiće mažurana preko povrća i pospite mrvicama.
Za mrvice pomiješajte brašno i naribani sir. Dodajte hladan maslac narezan na listiće pa ga utrljajte u smjesu od brašna da dobijete mrvice.
Pecite oko 30 minuta u pećnici zagrijanoj na 180°C ili dok mrvice ne dobiju zlatno žutu boju.

Blueberry and Mirto Jam

$
0
0
Blueberry jam with Mirto liqueur

I find such a huge pleasure in making jams at home that if I only had a possibility to get good quality fruit at reasonable price I think my house would be invaded by jars of all colours.
This year I got a little lazy and made only Strawberry Vanilla Jam, but, hey, at least three batches (if I remember well). And I got really sad when I realized the other day that all the apricot jam I made last year was gone (and I made quite a lot last year) and the apricot season is well over where I live. Perhaps it's still not too late to make some Peach jam instead.
There was, however, one jam that I never made - blueberries. I know there are mountains not far where they grow, but I never went blueberry picking myself. Those would be to die for. And would end up not only in jam but in my favourite liquer ever, Mirtillino.
To my surprise, a couple weeks ago I saw fresh blueberries sold at much lower price than I'm used to (at least 1/2 or 1/3 of the usual price), so I asked immediately for 1 kg. The girl looked at me all confused and asked me 3 or 4 times to confirm that I asked for such a "big" quantity. The high price was the main reason why I never made blueberry jam at home and I was definitely not letting go of this opportunity.
Since I normally like to add some fresh herbs to kick up the flavour of fruit, I was unsure what to do this time. To add some rosemary or thyme as usual? No, I wanted something different. I had seen a recipe once for blueberry jam with myrtle twigs added to aromatize it, but where on Earth could I find myrtle? As far as I know it grows only in Sardinia... And there I had a flash. The bottle of Mirto liqueur we brought from Sardinia a couple years ago. I love this liqueur. One of my favourite digestives. And so, a little part of it ended up in this jam. The result? Fantastic, fabulous, yummiest blueberry jam ever.

Blueberry jam with Mirto liqueur

A few words about the method I use. For the last 3 or 4 years, the industrial pectin has definitely disappeared from my kitchen. I never use any for the jams I make at home.
And if you thought the alternative was sweating for hours over the cooker, I'll prove you wrong.
First of all, I start the preparation in the evening. Wash, clean and eventually chop the fruit.
Then I mix it with sugar - I normally stay in the range of 350-400 g of sugar per 1 kg of fruit.
I let the fruit macerate in the fridge overnight and then proceed the following day.
By separating the pulp from the juice, and cooking the juice alone in the first phase, you actually save time and you don't torture the pulp later cooking it for hours.
As far as the help from pectin, I find the pectin naturally present in lemon skins and seeds works much better than the industrial powder. Ok, you may argue that with that powder jam is cooked faster, but it's the consisteny that bothers me. Naturally cooked jam has that rustic, thick consistency. If you heat it it won't turn into water like the store bought one or the homemade jam cooked with the addition of industrial pectin. If you use it as a filling for cookies or crostatas or croissants or  crescents, it won't simply turn into water and leak out or evaporate. On the contrary, even after baking you'll have the pleasure to enjoy it at it's best.
And I repeat, you will obtain this result in relatively short time, without actually slaving over it for hours.
I hope, really hope you'll give this method a chance and forget about industrial pectin for ever, like I have.


Blueberry jam with Mirto liqueur


Blueberry jam with Mirto liqueur

(ingredients for 600 ml or 800 g jam)
* 1 kg fresh blueberries
* 300 g fructose (or 400 g sugar)
* 2 lemons (juice, skins and seeds)
* 50 ml Mirto liqueur

Carefully wash the blueberries and remove all impurities.
Put the blueberries in large enough container with a lid. Stir in the fructose (or sugar), cover and let macerate in the fridge for 12-24 hours. Try to stir the fruit several times during this period to make sure the sugar melts evenly.
When ready to make your jam, separate the pulp from the juice pouring everything into a colander placed over the pot you'll be using to cook the jam.
Start cooking the juice first over medium heat until it starts caramelizing and has a consistency of a thick syrup, approx. 20-25 minutes.
In the meantime, peel the yellow zest from the lemons (you may discard it, unless using organic lemons, in that case save it for cakes or other). Cut the peeled lemons in half and squeeze all the juice.
Add the juice to the blueberry pulp. The empty  skins and the seeds will serve as a source of pectin, so make a little bundle tying them up in a piece of cheesecloth.
When the fruit juice has turned into a syrup, add the blueberry pulp and the lemon bundle in. Cook the jam stirring often over medium heat for about 20-30 minutes. Remove the skins and seeds trying to squeeze as much of the juices they've absorbed as possible (I recommend using a potato ricer if possible, it's the easiest and safest way ).
Continue cooking the jam for 5 more minutes and then remove from heat. Add the Mirto liqueur and fill the warm, sterilized jars with hot jam.
Turn the jars upside down to create the vacuum and let them cool down completely in this position. Turn them in normal position, label and store in a cool, dry place. Refrigerate the jam only after opening.
*To sterilize the jars, put the perfectly washed and dried jars into a cold oven. Turn it on to 110°C and leave the jars in for all the time the jam is being cooked. To sterilize the lids, I leave them immersed in alcohol and just take them out later without rinsing or drying them on the inside.


Blueberry jam with Mirto liqueur


Confettura di mirtilli con Mirto

(per 600 ml o 800 g di confettura)
* 1 kg di mirtilli freschi
* 300 g di fruttosio (o 400 g di zucchero)
* 2 limoni (succo, bucce e semi)
* 50 ml di liquore Mirto

Pulite e lavate i mirtilli. Metteteli in un contenitore con coperchio, aggiungete il fruttosio (o zucchero), mescolate bene e mettete a macerare in frigo per 12-24 ore. Durante questo tempo cercate di mescolarli più volte per far sì che lo zucchero si sciolga bene.
Trascorso questo tempo, separate la polpa dal succo che si è creato filtrandola attraverso un colino.
Mettete il succo in una pentola e cuocetelo a fuoco medio per circa 20 minuti (o poco più) finché cominci a caramellare e assumere l'aspetto di uno sciroppo denso.
Nel frattempo, sbucciate i limoni togliendo solo la parte gialla con un coltello o sbucciapatate. *se avete i limoni biologici, sfruttate le bucce per dolci o altro, altrimenti scartatele.
Tagliate i limoni a metà, spremete il succo e aggiungetelo alla polpa di mirtilli. Le bucce vuote e i semi, invece, raccoglieteli e legateli dentro un pezzo di garza. Questo pacchetto e la fonte di pectina e serve per far addensare la confettura.
Quando il succo che state cuocendo ha iniziato ad addensarsi, aggiungete la polpa con il succo di limone e il pacchetto con le bucce e semi.
Cuocete la confettura per circa 20-30 minuti mescolando spesso. Togliete il pacchetto con le bucce e spremetelo bene per far uscire più succo possibile (consiglio di usare lo schiacciapatate), lasciate cuocere per altri 5 minuti fino a raggiungere la densità desiderata (considerate il fatto che la confettura diventerà ancora più densa raffreddandosi). Togliete dal fuoco e aggiungete il Mirto.
Versate la confettura ancora calda nei vasetti caldi e sterilizzati. Chiudete i vasetti, girateli a testa in giù e lasciateli raffreddare in questa posizione. Una volta freddi, rigirateli e conservate la confettura in un luogo fresco e asciutto (dopo l'apertura conservatela nel frigorifero).
Per sterilizzare i vasetti, inseriteli ben lavati e asciugati nel forno freddo. Accendete poi il forno a 110°C e teneteli così per tutto il tempo che la confettura si sta cuocendo. Per sterilizzare i coperchi invece, li metto nel alcol per 15-20 minuti senza sciacquarli o asciugarli dopo.
Nella mia esperienza, confetture preparate in questo modo si conservano benissimo anche per 2 anni. Appena preparate hanno un colore bellissimo, e la consistenza fantastica (cambia naturalmente con il tipo di frutta). E completamente naturale e senza conservanti, ma si conserva benissimo anche se non avete una cantina o altro luogo fresco in casa come me. 

Blueberry jam with Mirto liqueur


Pekmez od borovnica s Mirtom

(za 600 ml ili 800 g pekmeza)
* 1 kg svježih borovnica
* 300 g fruktoze (ili 400 g šećera)
* 2 limuna (sok, kore i sjemenke)
* 50 ml likera Mirto

Pažljivo operite borovnice, odstranite eventualne listiće i/ili druge nečistoće.
Stavite ih u veću plastičnu posudu s poklopcem. Dodajte fruktozu (ili obični šećer) promiješajte poklopite i stavite u hladnjak na 12-24 sata. Tijekom tog vremena, nastojte promiješati voće nekoliko puta da se šećer bolje istopi.
Kad ste spremni kuhati pekmez, uspite voće u cjedilo i odvojite pulpu od soka koji je voće pustilo.
Stavite sok u lonac i kuhajte ga na srednje jakoj vatri 15-20 minuta, sok će se početi lagano zgušnjavati u sirup.
U međuvremenu ogulite limunovima vanjsku, žutu koricu (skinite tanki sloj) i odbacite je (ako vam je limun neprskani iskoristite je naravno za kolače, kekse itd.). Prepolovite limunove i iscijedite sok iz njih, ali sačuvajte sjemenke.
Naprevite zavežljajčić od gaze u koji stavite iscijeđene polovice limuna i sjemenke.
Kad se sok lagano zgusnuo u sirup dodajte pulpu borovnica, sok limuna  i zavežljajčić s limunovim koricama i sjemenkama.
Kuhajte dalje 20-30 minuta. Izvadite zavežljajčić s limunom i dobro ga iscijedite jer upije dosta pekmeza. Najlakše je to napraviti tijeskom za krumpir.
Kuhajte pekmez još pet minuta, maknite s vatre, umiješajte liker, a zatim ga sipajte još vrućeg u tople, sterilizirane staklenke.
Da biste sterilizirali staklenke, stavite ih dobro oprane i posušene u hladnu pećnicu. Uključite pećnicu na 110°C u trenutku kad počnete kuhati pekmez i neka stoje tako dok pekmez nije gotov.
Kad ste usuli pekmez u staklenke, zatvorite poklopcima i okrenite ih naopako. Na taj način će se stvoriti vakuum i ujedno poklopci sterilizirati od topline pekmeza. Kad se pekmez potpuno ohladi vratite staklenke u normalan položaj i spremite ih u ostavu.

* Svrha korica limuna (samo bijelog dijela) i sjemenki je brže zgušnjavanje pekmeza, budući da i jedno i drugo prirodno sadrže pektin. Dakle služe kao prirodna zamjena za prah želin. Može vam se tijekom kuhanja činiti da je pekmez previše rijedak, ali će se hlađenjem dodatno zgusnuti, stoga nemojte pretjerati s ukuhavanjem (govorim iz iskustva).
* Ako volite pekmez bez komadića voća, prije nego ga sipate u staklenke kratko ga promiksajte štapnim mikserom.
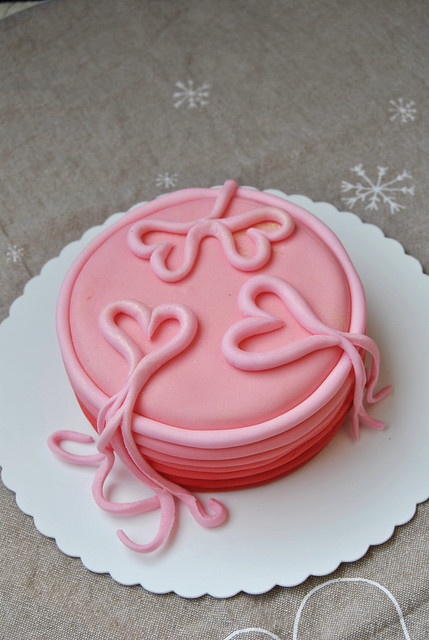
Blueberry jam with Mirto liqueur

Chocolate Dulce de Leche Cupcakes

$
0
0
DSC_0343

I am by no means a cupcake expert. The only time I made some real frosted cupcakes I was totally disappointed with how they tasted (the quantity of butter in them made them taste horrible and the buttercream frosting just didn't do for me). So I let them be for a while. And to be honest, both me and the kids prefer a good muffin, the only preferance going from chocolate to fruit ones. Less mess, less fussing, less dishes to wash.
However, a couple weeks ago, I wanted to surprise my friend with something sweet and something with dulce de leche that she loves so much, she literally went crazy for this cake.
I chose a recipe from this book for the cupcakes and the frosting came together spontaneously since I really had few things in the fridge to work with. But I think it came out pretty good. The cupcakes are incredibly moist and soft, definitily a keeper.
Now, I'd like to have a couple of these again, to make the return from our long vacation easier and sweeter. And while I'm reading everywhere about kids going back to school, here we have to wait ten more days and that means kids are impatient, bored, and having them help in the kitchen is one of their favorite ways to kill the boredom. So, aprons and whisks, ready, steady, go!!! Are you joining us?
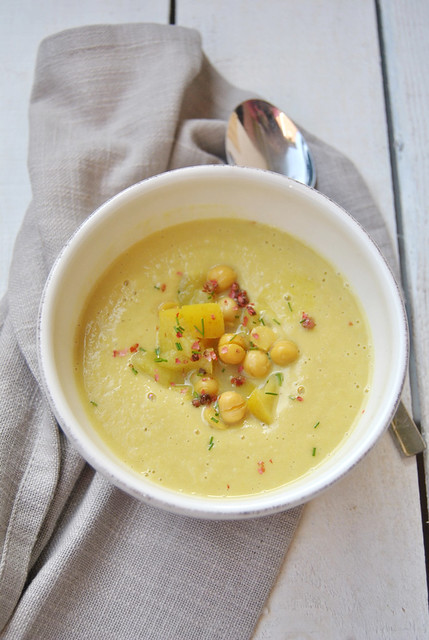
Chocolate Dulce de Leche Cupcakes


Chocolate Dulce de Leche Cupcakes

(for 16 cupcakes)
* 110 g butter
* 260 g sugar
* 2 eggs
* 180 g flour
* 4 TBspoons unsweetened cocoa
* 1 teaspoon baking powder
* 1/4 teaspoon salt
* 120 ml milk
* 120 ml water

Dulce de Leche frosting
* 60 g butter
* 160 g cream cheese
* 160 g dulce de leche
* 40 g powdered sugar

For the cupcakes, beat the softened butter with sugar until creamy. Add one egg at a time and continue mixing.
Mix and sift together the flour, the cocoa, the salt and the baking powder.
Add half of the dry ingredients into the batter.
Mix in the milk and water before adding the remaining dry ingredients.
Line a muffin pan with paper cups and fill them with the prepared batter up to 3/4.
Bake the cupcakes in an oven preheated to 180°C, for about 20 minutes - check with a tootpik inserted in the middle- it should come out dry.
Let the cupcakes cool on a cooling rack.
For the frosting, Beat the softened butter with the cream cheese until creamy.  Add the dulce the leche and mix again until the mixture is homogeneous.
I suggest you taste the frosting befor adding the powdered sugar - I added it, but some people may find it already sweet enough.
Leave the frosting in the fridge for at least 1 hour, then fill a pastry bag and decorate your cupcakes.


Chocolate Dulce de Leche Cupcakes

Cupcakes al cioccolato e dulce de leche

(per 16 tortine)
* 110 g di burro
* 260 g di zucchero
* 2 uova
* 180 g farina "00"
* 4 cucchiai di cacao amaro
* 1 cucchiaino di lievito per dolci
* 1/4 cucchiaino di sale
* 120 ml di latte
* 120 ml di acqua

Crema al dulche de leche:
* 60 g burro
* 160 g formaggio philadelphia
* 160 g dulce de leche
* 40 g zucchero a velo

Per i dolcetti, sbattete il burro ammorbidito con lo zucchero finché diventi cremoso. Aggiungete le uova, uno alla volta continuando a sbattere.  
Setacciate insieme la farina, il cacao, il sale e il lievito.
Aggiungete metà dei ingredienti secchi nello composto di burro e uova.
Aggiungete il latte e l'acqua, e infine la farina rimanente.
Foderate uno stampo per i muffin con dei pirottini di carta e riempiteli fino a 3/4 di altezza.
Infornate i dolcetti a 180°C, per circa 20 minuti - controllate la cottura con uno stuzzicadenti inserito al centro, deve uscire asciutto.
Lasciate raffreddare i dolcetti su una griglia.
Per la crema, sbattete con uno sbattitore elettrico il burro ammorbidito con il formaggio philadelphia fino a renderlo cremoso. Aggiungete il dulce de leche e sbattete di nuovo per ottenere una crema omogenea.
Consiglio di assaggiare la crema prima di aggiungere eventualmente lo zucchero a velo, perché potrebbe già così risultarvi abbastanza dolce. Regolatevi secondo i propri gusti. 
Lasciate la crema rassodare in frigo per almeno un ora. Trasferitela in una tasca da pasticcere e decorate i cupcakes a piacere.


Chocolate Dulce de Leche Cupcakes


Čokoladni cupcakes s karamel kremom

(za 16 kolačića)
* 110 g maslaca
* 260 g šećera
* 2 jaja
* 180 g brašna
* 4 žlice gorkog kakaa
* 1 žličica praška za pecivo
* 1/4 žličice soli
* 120 ml mlijeka
* 120 ml vode

Krema
* 60 g maslacal
* 160 g krem sira (philadelphia)
* 160 g dulce de leche
* 40 g šećera u prahu

Za kolačiće, mutite mikserom omekšali maslac sa šećerom dok ne dobijete pjenastu smjesu. Dodajte jedno po jedno jaje i opet dobro umutite.
Pomiješajte i prosijte skupa brašno, kakao, sol i prašak za pecivo.
Dodajte polovicu suhih sastojaka u smjesu jaja i maslaca.
Zatim umiješajte mlijeko i vodu, i na kraju preostalo brašno.
Obložite kalup za muffine papirnim košaricama i napunite ih do 3/4 visine.
Ispecite kolačiće u pećnici zagrijanoj na 180°C, oko 20 minuta - provjerite čačkalicom ubodenom u sredinu kolačića, mora izaći suha.
Izvadite kolačiće iz kalupa i ostavite ih da se ohlade na rešetki.
Za kremu, stavite u zdjelu omekšali maslac i krem sir sobne temperature. Mutite mikserom dok ne dobijete pjenastu smjesu. Dodajte dulce de leche i opet umutite mikserom da se smjesa izjednači.
Kušajte kremu i po svom ukusu dodajte još i šećer u prahu (ja jesam) ili ga izostavite ako volite malo manje slatko (isto tako umjesto šećera možete povećati količinu dulce de leche).
Kremu ostavite u hladnjaku barem 1/2 sata do sat, a zatim napunite slastičarsku vrećicu za ukrašavanje i ukrasite cupcakes po želji.

Chocolate Dulce de Leche Cupcakes

Lemon and Almonds Fusilli

$
0
0
Lemon and Almond Fusilli

Pasta is something that can never lack on our family table. My husband lives for a plate of pasta, my kids are so bored with food that when I ask what they want for lunch the easiest answer is always pasta. They all have their favourites, of course. But I'll be honest, if I were alone at home every day, I'd perhaps eat pasta once a week. And it would be neither of their favourites.
It is those rare moments when I'm alone at lunch time that I can try new recipes and eat something less boring than Spaghetti al pomodoro or Penette ai quattro formaggi.
This was one of those moments. It's an easy dish to prepare. It's unusual. It smells and tastes good. It's light and healthy.  But I know none of my family would join me, either because it's "dry" or because it's got "strange things in it". So if you are like me, give it a chance. If you rather stick to classics, you'll probably skip it ;)))
Whatever the case, I wish you a great weekend, good food, good company and no negative thoughts to bother you!

Lemon and Almond Fusilli

Lemon and Almonds Fusilli

* 360 g fusilli pasta
* 70 g bread crumbs
* 1 TBspoon of finely grated zest from an organic lemon
* 1/2 teaspoon powdered cinnamon
* 80 g roughly ground almonds
* 20 g butter
* 2 TBspoons extra virgin olive oil
* saltied ricotta
* 1 twig of fresh oregano
* salt and pepper

Heat the butter in a skillet on low heat until it's completely melted.
add the finely grated lemon zest, and a few seconds later the almonds, too. Stir occasionaly and let the almonds toast lightly (for about 2 minutes).
Add the cinnamon and the breadcrumbs and cook everything shortly, stirring, then remove from heat.
In the meantime cook the pasta in a large pot of boiling, salted water. Drain them when cooked al dente and add to the skillet with seasoning. Toss everything together to coat the pasta evenly.
Add some fresh origano leaves and a little freshly ground pepper.
Serve with the addition of grated salted ricotta.


Lemon and Almond Fusilli

Fusilli alle mandorle e limone

* 360 g di fusilli
* 70 g pangrattugiato
* 1 cucchiaio di scorza di limone grattugiata
* 1/2 cucchiaino di cannella in polvere
* 80 g di mandorle tritate grossolanamente
* 20 g burro
* 2 cucchiai di olio extra vergine d'oliva
* ricotta salata
* 1 rametto di origano fresco
* sale e pepe

Scaldate il burro in una padella sul fuoco dolce. 
Aggiungete la scorza di limone finemente grattugiata e dopo qualche secondo anche le mandorle. Fate tostare le mandorle leggermente e prendere un po' di colore (circa 2 minuti).  
Unite la cannella e il pan grattugiato,  saltando tutto insieme brevemente e poi spegnete il fuoco.
Nel frattempo cuocete i fusilli in una pentola con l'acqua bollente, salata e scolatela quando è cotta al dente. Aggiungete la pasta nella padella con il condimento e mescolate bene.
Aggiungete delle foglioline di origano e un po' di pepe.
Servite con la ricotta salata grattugiata. 


Lemon and Almond Fusilli

Fusilli s bademima i limunom

* 360 g fusilla
* 70 g krušnih mrvica
* 1 žlica naribane korice neprskanog limuna
* 1/2 žličice cimeta u prahu
* 80 g grubo mljevenih badema
* 20 g maslaca
* 2 žlice maslinovog ulja
* slana ricotta
* 1 grančica svježeg origana
* sol i papar

Staviti maslac i ulje u tavu i zagrijte na laganoj vatri da se maslac otopi.
Dodajte naribanu koricu limuna, nakon par sekundi dodajte bademe i miješajući povremeno pustite da se bademi tostiraju, tj. da poprime malo boju (oko 2 minute).
Dodajte cimet i krušne mrvice, kratko sve skupa miješajte na vatri a onda maknite tavu.
U međuvremenu skuhajte fusille u većoj posudi sa slanom, ključalom vodom.
Kad su kuhani al dente, ocijedite ih i dodajte u tavu s mrvicama i bademima i dobro izmiješajte.
Dodajte listiće svježeg origana i svježe mljeveni papar.
Poslužite uz dodatak naribane slane ricotte.
Viewing all 183 articles
Browse latest View live